Monday, September 12, 2011

Meatless Monday & Mexican Pizza


One of our favorite grocery stores recently started carrying a gluten free Mexican pizza.  It sounded great to us but found that while some of them were great, others were not so good. They were too spicy for one of us and not flavorful enough for others. We really liked the concept, though, so I wanted to figure out an easy version to be able to make on busy school days.  I have tinkered with a couple of crust versions and this is our favorite.  It holds up to the toppings, is a little crunchy and has a nice corn taste.  We liked it rather thick (as you can see in the picture below) but you can always pat it thinner.

The toppings can be anything you like.  We have done pureed pinto and black beans, grated Colby jack cheese, guacamole, salsa, chopped onion, chopped cilantro, sliced fresh from the garden Jalapeños and hot sauce.  You can be creative and add anything you like.

If you’re starting out on the Feingold program you can make this stage one easily.  Just keep the salsas and peppers off and you will still have a lot of flavor.

Mexican Pizza
Have 2 baking sheets covered with parchment or pizza stones ready
Oven to 425 degrees - makes six individual pizzas.

For the crust:
1 package Bob’s Red Mill Gluten Free Corn Bread Mix
1 Cup Water
2 Eggs
½ teaspoon Cumin
Dash Garlic Powder

Mix everything together for a stiff dough.  Divide into six balls.  Pat each ball into a circle with damp fingers on your parchment lined baking sheet.  Mine were about six inches across. Three crusts fit well on each sheet.

Bake at 425 for 20 minutes.

For the black bean “sauce” just puree one can of beans with a bit of the liquid in the can - add a bit more if the beans are too thick. You want it to be the consistency of pizza sauce. That will be plenty for six pizzas.

Sprinkle your pizzas with your favorite toppings and put back in the oven briefly – five to ten minutes for us. 

Garnish with salsa and guacamole and enjoy!

Sunday, September 11, 2011

Comfort Food Today


Like many people today, I spent much of the day remembering what happened ten years ago. Many prayers were said today for families of those lost and for those serving our country now.

We had crepes filled with ice cream for brunch today - a new comfort food for sure. I'd never made them before but had watched the crepe maker at The Breizh Cafe. Mine were not nearly as pretty as what we had there. It didn't matter a bit - they were eaten too quickly to really notice. We were together and I cherished our time.

I used Arrowhead Mills Buckwheat Flour and adapted the recipe on the back of the package. Buckwheat flour, despite "wheat" in the name is actually gluten free. The recipe, though, called for whole wheat flour and I decided to sub Pamela's Baking & Pancake Mix rather than another single gluten free flour. Because they were going to be dessert crepes I used Vanilla Coconut Milk.


Buckwheat Crepes:

2/3 Cup Buckwheat Flour
1/2 Cup Pamela's Baking & Pancake Mix
1 Tablespoon Honey
2 Eggs
1 1/4 Cup Vanilla Coconut Milk.
1/4 Cup Butter, melted

Whisk everything but the butter together in a large bowl.

I used a large flat cast iron pan heated to medium hot and spread or pour a bit of melted butter on the pan between each crepe.

Using about 1/2 cup of batter for each crepe, pour into center of pan.  I spread the batter thinly out from the center with this tool until it was as thin as possible.  None were pretty, not one was perfectly round but it doesn't matter.  Just like a regular pancake, when the surface loses its shine and starts to bubble it is ready to flip.  Give it just another couple of minutes and stack them on a plate and covered with a clean kitchen towel to keep them warm as you finish.

Fill them with ice cream and drizzle with honey, fold and enjoy.

Wednesday, September 7, 2011

Mini Chocolate Chip Pumpkin & Ginger Muffins!


Once Labor Day is behind us it really starts to feel like fall to me - even though it's still pretty hot and humid here. We start some of our homeschooling classes in August because our enrichment activities start early.  After Labor Day weekend our full routine is kicks so now it is time for fall and pumpkin! These mini muffins are the kind of breakfast and snack I love - easy to make, easy to grab and packed full of nutrition.

While I made them in a mini muffin pan today, you can make them larger or even spread the batter into a 13 x 9 pan.  Just adjust the baking time accordingly.

Pumpkin not only tastes like everything wonderful about fall, it's packed with nutrition and fiber. No butter or oil is needed because the pumpkin keeps everything moist and delicious. The crystallized ginger sweetens and spices up the muffins at the same time. I minced the chunks of ginger until they were the size of the mini chocolate chips so the flavors would be evenly distributed.  Enjoy Life mini chips are perfectly sized for mini muffins.

Mini Chocolate Chip Pumpkin & Ginger Muffins
Preheat oven to 375 degrees
Prepare muffin pan by greasing or lining with paper liners

1 lb. Almond Meal
6 Eggs
1 cup Reed's Crystallized Ginger, very finely minced
1 can Pumpkin (15 ounces)
1 T Honey
1 T Vanilla
1 T Baking Soda
1/2 t Sea Salt
1 cup Chocolate Chips

Mix everything but Chocolate Chips together until well combined. Stir in chocolate chips and spoon into muffin pans.  Four dozen little mini muffins baked in just under 15 minutes in my oven.

Enjoy!

Happily shared on Gluten Free Wednesdays at Gluten Free Easily!

Saturday, September 3, 2011

So close!


First round of honey graham style crackers for s'mores.  Very close but not quite there. There are worse things to do than test s'mores. =D

Friday, September 2, 2011

Elana's Paleo Bread - Yum!


I need to share this recipe now.  Elana of Elana's Pantry always has great recipes but this bread is one of her best in my opinion.  It's hearty, nutritious, moist and delicious.  Easy, too.  

Elana's recipe calls for almond flour and even though I only had almond meal in the pantry I went ahead and gave it a try. The original recipe calls for a smaller pan than I have so I doubled the recipe and made one very large loaf using a standard size pyrex loaf pan. I had to bake it several minutes longer because of the size but it came out perfectly.  With the almond meal, coconut flour, flax meal and all those eggs it's just packed with protein.  A thin toasted slice spread with peanut butter was a really satisfying breakfast. The sandwiches we made with it were wonderful. It's great with butter and it's just perfect plain, too.  Pretty impressive for any bread, let alone a gluten free bread.

Right now I'm working on gluten free graham crackers for end of summer s'mores now so it's back to the kitchen for me. =D 

Wednesday, August 24, 2011

Chewy Chocolate Cherry Bars


I blame Gabby for these.  She pinned a recipe on Pinterest a few days ago that got my attention. Chocolate Cherry Oatmeal cookies. The original recipe looks great and I would think you could just substitute the all purpose flour with any gluten free flour mix and, of course, use gluten free oats.  But I wanted a chewy texture like these Jumbo Date Cookies.  Peanut butter sounded a little overwhelming with the other flavors, but I wanted the protein/fat of nuts for nutrition and texture. Cashew butter was the most obvious choice to me but since I didn't have any in the pantry I just processed a cup of cashews in the oil called for in the recipe and it literally took seconds.  I happened to have roasted and lightly salted cashew pieces in the pantry but I think any cashews would work. Baking them as bars rather than cookies was a time saver.


 Chewy Chocolate Cherry Bars
1 cup Cashews (I used roasted and lightly salted cashew pieces)

1/2 cup Grapeseed oil (or any mild oil you like to use)
4 cups Quick-Cooking Oats - I used Bob's Red Mill
1 cup Turbinado Raw Cane Sugar
1 1/2 teaspoon Baking Powder
3 Eggs

2 teaspoons Vanilla

1 1/2 cups Dried Cherries, coarsely chopped
1 cup dark chocolate chips


Preheat oven to 350.


Process the cashews and oil until creamy and put in mixing bowl with everything but the cherries and chocolate chips.  Mix thoroughly and add the cherries and chocolate chips. 


Spread into pan and bake for about 30 minutes until golden brown.  Cool and cut into squares


Enjoy!

Sunday, August 7, 2011

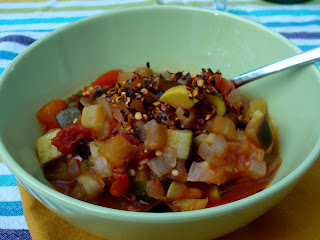
Meatless Monday – Ratatouille with Fried Crushed Peppers


Late summer is the best time of year to make a pot of ratatouille and everything you need is fresh at your farmer’s market now.  Like all my favorite recipes this is very flexible.  More zucchini and less yellow squash, not a problem.  Less eggplant and more bell peppers would work just fine, too.

It’s quick to put together and is one of those wonderful dishes that tastes even better the next day.  A bowl of ratatouille is great on its own and we love it over rice, too.  We often sprinkle parmesan cheese over the top but this time we tried something new.

Friday evening we had curry at Martin’s and we asked him about the crushed red peppers he keeps on the counter.  We love the smoky heat they give our meals. I asked him what made them different than the usual crushed red peppers you sprinkle on pizza.  When he told me he fried them I knew I had to try that for myself. While making the ratatouille I decided to go ahead and try frying a cup of peppers never planning to use them on our meal. But they smelled so amazing together that we had to give it a try. Oh my goodness it was such a great combination!

Ratatouille:

Chop into half inch dice:

1 medium Eggplant
2 medium zucchini
2 medium yellow squash

Place into a bowl or salad spinner and salt generously.  The vegetables will “sweat” any bitter liquid out while sitting.

Meanwhile, mince and sauté in a large pot or dutch oven:

1 tablespoon olive oil
1 large yellow onion
1 large red bell pepper
4 cloves of garlic

Rinse the eggplant, zucchini and squash in cold running water and drain.  Add to the pot and combine.

Add:

1 large can of tomatoes, diced (mine was 28 ounces)

Simmer 30 – 60 minutes, stirring occasionally, until vegetables are tender and flavors have combined.

Fried Crushed Peppers:

1 cup crushed red peppers
1 tablespoon oil of your choice

In small pan sauté peppers slowly until they just start to change colors.  Watch carefully so they don’t burn and take off heat as soon as they start to brown.  They will continue to brown a bit as they cool in the pan so give it a stir occasionally as they cool.  Store in a glass jar and sprinkle on ratatouille to taste.  


Enjoy!