Showing posts with label Coconut. Show all posts

Wednesday, July 9, 2014

Honey Sriracha Madness

So this Honey Sriracha Madness is Marie's fault entirely. You see, Marie, Marc and Aiden were running in the grocery store as Joe and I were running to our car a few weeks ago. 

Marie mentioned she was making Honey Sriracha Chicken for dinner that night and I was intrigued. A quick check of Pinterest later that night gave lots of variations. All super simple and I never did go back to look at a recipe.

And since it's been way too long since Aiden has made an appearance on the blog I am sharing this photo our amazing Gabby took at his dedication last month. It's hard to believe he's going to be one in just under a month!

But back to food. So why am I giving you three? Because it was a great excuse to put up a pic of Aiden and because it's really good! I love to play around with a good recipe and make it my own varying ingredients to my family's tastes. You can adjust the honey and Sriracha to your taste to make it sweeter or milder or scorching hot! 

For the Honey Sriracha Chicken Bowls, I just let one and a half pounds cubed chicken simmer in a tablespoon of coconut oil. As the cubes were barely cooked through I added about 1/4 cup honey, about a tablespoon Sriracha and a dash of lime juice and garlic and simmered until the sauce was thick and caramelized but not dry.

Stop when you like the consistency - really saucy to drizzle over the rice - simmer a little less time. Super caramelized, go a little longer.

It was amazing over a bowl of steaming rice with some fresh herbs sprinkled on top. We used mint, cilantro and basil for a Thai-inspired flavor.


Our favorite vegetarian version is this delicious Honey Sriracha Mushroom Sauté.

It's super simple. Clean and quarter a pound of mushrooms. Sauté mushrooms in a medium skillet in one heaping tablespoon of honey and one heaping teaspoon of Sriracha. No oil is necessary. Leave the lid off and stir everything together. The mushrooms will release their juices and the sauce with start to thicken after a few minutes. We love this served over rice (fried rice in this pic) and with kimchee.


Honey Sriracha Beef Lettuce Wraps have to be the easiest lettuce wraps you can make and are amazingly flavorful. To make these simply brown one pound of organic, grass fed ground beef with about a half cup of minced onions. Stir in the same heaping tablespoon of honey and heaping teaspoon of Sriracha and sauté until the sauce is thickened.


I topped lettuce leaves with julienned red peppers and spiralized cucumber and added the beef and cilantro. Chris loved these even though our lettuce didn't "wrap" this time. 

Relax in the kitchen and be creative - it makes eating healthy much more fun.

Happily shared on Gluten Free Wednesdays!


Monday, November 11, 2013

Easy Peasy GF(CF) French Toast

While making a hot breakfast in the morning isn't my claim to fame, I've actually made this easy French Toast two mornings in a row. It's that quick and easy.

Udi's sells wonderfully large loaves of their bread at Costco. Normal adult bread sized slices of bread that make sandwiches and toast that fit my guys' appetites. The texture of Udi's is great for French toast as well, it absorbs lots of egg mixture without getting soggy.

This is an easy recipe to divide in half or double. I just keep the same ratio of one large egg and 1/3 cup of light coconut milk to three slices (or four smaller slices) of bread. The light coconut milk I use is Trader Joe's. It has a pour-able consistency that makes it a great sub for regular milk in many recipes. I fry these up in either coconut oil (CF) or butter and we like both versions.

Easy Peasy GF(CF) French Toast

Preheat skillet (I prefer cast iron)

Six slices GF bread such as Udi's
2 large Eggs
2/3 cup Light Coconut Milk
pinch of vanilla bean powder (optional but nice)
2 Tablespoons Coconut Oil or Butter for Frying

In a low, wide bowl or 8x8 square pan whisk Eggs and Coconut milk and add the Vanilla Bean Powder if using.

Briefly soak each slice in the egg mixture and fry in Coconut Oil or Butter a few minutes on each side until lightly browned. While Joe prefers them plain or with butter, a topping of fruit preserves is delicious, too.


Enjoy!


Friday, July 26, 2013

Friday Finds - Pamela's Whenever Bars

Pamela's Whenever Oat Chocolate Chip Coconut Bars have called my name many times in many different stores for a while but on a visit to Harmony Farms a couple of weeks ago I finally grabbed a box. I had really tried not to give in because I knew I'd have another Pamela's addiction. Pamela's pancake and bread mixes are always in my pantry. Everyone - gluten free or not loves them. As predicted, these are absolutely amazing. The Oat Chocolate Chip Coconut flavor is perfect. Moist, chewy oats and the perfect balance of chocolate and coconut - two of my favorite flavors.

This morning Joe had to get his wisdom teeth out and we had to leave really early. My Joe is a breakfast guy so leaving without eating wasn't easy for him and I didn't want to eat in front of him. I stuck some into my bag for Chris and I to eat after Joe went back to surgery.

Lots of coffee and one and a half bars later I'm still going strong. While the bars aren't big they are really satisfying. They're a great size to keep in your bag or backpack for those times you get stuck out longer than you expect and can't find something healthy and gluten free. I'll be picking up another box (or two) today.


And please don't forget about The Raleigh Gluten and Allergen Free Wellness Event next month. So many favorites will be there.

Thursday, July 18, 2013

Gluten Free Blueberry Muffin Bread!

It's good to be a ChaCha for so many reasons. I loved the name the very moment my Ev gave it to me three years ago and I adore that his sweet and sassy little sister yells "my ChaCha" and comes running when I pick her up from camp. Ev will tell you it is a very good name and he's excited (and just a little proud) that our soon to be grandbaby Aiden will be calling me ChaCha when he's old enough.

Being ChaCha has it's perks, too!  When Ev and Ollie went blueberry picking at Herndon Hills Farms last week, Gabby gave me a huge bag of the most gorgeous, freshest blueberries I've seen in a long time. While I haven't been to Herndon Hills Farms, Gabby vetted the farm and they use only natural materials approved by the OMRI (Organic Materials Review Institute) and are working towards organic certification. Gabby's photos show how beautiful the farm is, too. Lucky for me, Evan and Ollie can pick a lot more berries than they can eat! Can you see that Ollie can hardly hold up her own bucket!?!


I wanted to make some gluten free coconut flour muffins, similar to these but with a splash of lime juice and chock full of blueberries. Since I had just washed the loaf pan and it was still on the counter, I used it instead of the muffin pan and liners, although this recipe should make twelve muffins easily.

And please take a moment to read Pam's blog at I'm A Celiac on the Gluten Free and Allergen Free Wellness Event next month in Durham! It's a wonderful blog to sit and explore when you have some time. In this post, Pam's got lots of information and some really helpful tips for first time visitors. It would be wonderful to see lots of friends there!


Gluten Free Blueberry Muffin Bread

Heat oven to 400 degrees
This lemon "glaze"? Will tell more soon!
Grease a Pyrex loaf pan with Coconut Oil 

1/2 cup Coconut Flour
1/4 teaspoon Sea Salt
1 Teaspoon Baking Powder
6 Eggs
1/2 cup Coconut Milk, canned
1/3 cup Sugar
1 Tablespoon Lime Juice
1 Tablespoon Vanilla

Combine all ingredients in bowl of Kitchenaid mixer on low speed to combine.  Increase speed to medium high for two minutes or until smooth. 

Gently mix in.

1 Cup Fresh Blueberries 

Pour into greased pan and bake for approximately 50 minutes until golden brown. You can use a toothpick to test the center, but you'll know it's ready when you gently press on the center of the loaf and it feels firm.

Enjoy!

Thursday, May 16, 2013

GF Raw Macaroons & Tea With Pattie


Pattie was coming by for a quick cup of tea in the garden this morning and I wanted to make something quick but special. It also needed to be light and healthy. I remembered some amazing raw macaroons my friend Laura had made a while back and decided to try to recreate them. Since my guys are gone on a road trip I purposefully made a small batch so that I wouldn't have too many left over to gorge on. These may not be exactly like Laura's but we really enjoyed them. The almond extract is a stage 2 Feingold ingredient but you can skip it and they will be delicious. Not only are these treats gluten free but they are also casein free and vegan. Perfect for so many of our friends' diets these day.

If you have everything on hand you can be eating them in minutes. Store them in the fridge and they will melt in your mouth.

I've just shared them over at Gluten Free Cat's Raw Thursdays! Gluten Free Cat is one of my favorite gluten free blogs and one of my Link Loves.

Raw Macaroons
Make 8 but can easily be doubled or tripled.

1 1/2 Cups Shredded Coconut
3 Organic Medjool Dates (if not very moist, soak in water for a few minutes)
3 Tablespoons Coconut Cream Concentrate, Coconut Butter or Coconut Manna depending on brand
1 Tablespoon Coconut Oil
1 Teaspoon GF Vanilla Extract
1 Teaspoon GF Almond Extract

In a food processor combine all ingredients, except the shredded coconut and mix until the dates are completely pureed. Add coconut and process just long enough to mix. You want a bit of texture.

Scoop into one tablespoon balls either rolling by hand or using the tablespoon to shape.

Store in the fridge until ready to serve.

Enjoy!

Sunday, April 28, 2013

Delicious Dosas!


This is a post that has taken ages to finally get on the blog.  As difficult as it has been to get posted is as easy as they are to make. Dosas are a uniquely Indian flatbread and come in many flavors and combinations of rice and lentils - some thick and the size of pancakes and some crepe thin, crispy and larger than dinner plates. These dosas are made by soaking and grinding rice and lentils into a smooth batter and then fermenting the batter to give it a delicious tang - a bit like sourdough bread. This makes them a good starting point for traditional fermented foods. I like to make them this time of  year when my kitchen is warmer and fermenting is quicker.

Several years ago I was part of an online health board and one of my board-mates was a lovely Indian woman named Sangeetha. When she learned that I love Sri Lankan and Indian food she asked if I had ever made dosas before and proceeded to teach me by email. She taught me a plain version and one her kids called pizza dosas. Today's post is the plain version and I'll post the pizza dosas soon.

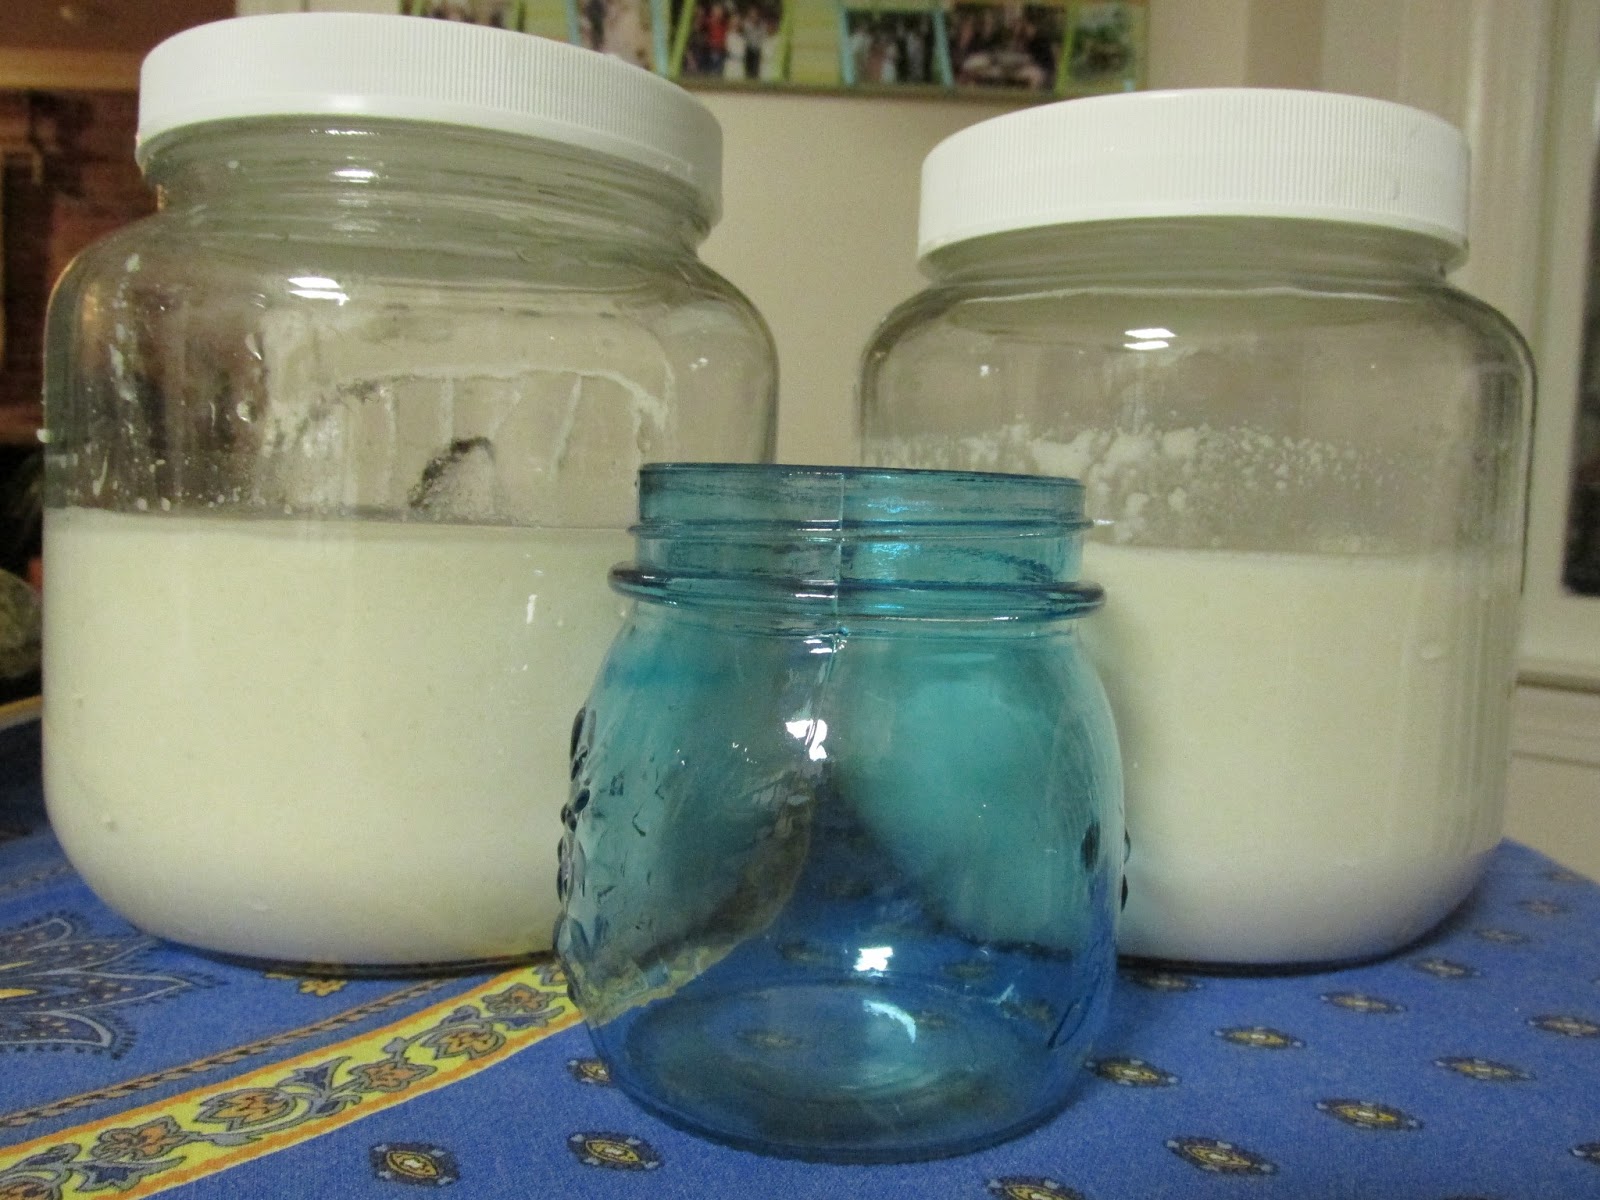
While the process is super simple you need to plan in advance because you'll soak for one day and ferment overnight. You can see that I'm soaking the rice and lentils in separate jars and each jar has a pinch of fennugeek seeds. The jars look a bit cloudy but the rice and lentils were each rinsed very well.

The lentils look almost white yet they are called black gram dal or urad dal and can be found in every Indian or Asian market in our area. You can use any lentil, only the color will really be affected.

After twelve hours the jars are rinsed with fresh water and left for another twelve hours.  At this point some of the water is drained and it's time to grind the soaked rice and lentils. I have used a regular blender, an immersion blender and my Vitamix. The Vitamix obviously grinds faster, but all will work. You'll need enough water in the jar to keep the mixture liquid - like a thick cream or pancake batter.

Once the mixture is blended, pour it back into clean jars and put the lid(s) on loosely. I've put the blue jar between the two jars just to give you perspective on the fermentation. You can see the batter is almost as high as the blue jar here. I set the jar out about 9:00 p.m. on Friday.


Here's what it looked like by mid-day Saturday. You can see the batter is naturally fermenting and has grown considerably. You can also see air bubbles throughout the jars letting you know the fermentation is complete.

Do keep an eye on your jars as they start to expand, as they can easily bubble up over the top!

Next step is to add a bit of salt and get cooking! One key ingredient is your cooking oil. I only use coconut oil for cooking my dosas. In fact, it's the most used oil in my kitchen.

The pan you use is very important. A stainless steel skillet will get sticky no matter how much oil you use. I don't have non-stick pans because I'm concerned about the chemicals leeching into our food. The only pan I use for dosas (and making tortillas) is my cast iron pan. A well seasoned cast iron pan is better than any non-stick pan I've ever used.

Delicious Dosas

Ingredients:
1 cup Rice - I use Organic Basmati
1 cup Lentils - I use Urad Dal or split Black Gram Lentils
Pinch of Fennugeek seeds
Sea Salt - added after fermenting
Coconut Oil for frying

Using one jar for the rice and one jar for the lentils, pour each into their separate jars and rinse thoroughly under running water being careful to not let the rice or lentils flow out of the jars as you pour off excess water. When the water runs clear fill each jar with filtered water and let sit 10 to 12 hours with lids on.

Rinse and refill each jar, put the lids back on and let sit for another 10 to 12 hours.

Now that the jars have sat out nearly a full day you can start your batter. Pour off some excess water, leaving the water level just about even with the rice and lentils. I actually doubled the recipe in the photos above so I couldn't fit both jars into my blender at once but you should have no problem doing so. My Vitamix plows through the mixture quickly but you may need a bit more water if you're blender is having trouble mixing the rice and lentils into a batter.

Just like a pancake batter is thicker than a crepe batter the thickness of your dosa batter will affect the thickness of the cooked dosa. I have better results with a pancake consistency.

Now put your batter back into the clean jar(s), put the lid on and give it some time to ferment and get bubbly. I put my jars out about 9:00 in the evening and by lunch time the next day that had risen and were nice and bubbly. Since I wanted to make them for dinner I added a teaspoon of sea salt to the mixture and popped it in the fridge until dinner time. This slows down the fermentation. The batter will keep a couple of days in the fridge.

To cook:

Heat a cast iron pan on medium heat and add a spoonful of coconut oil to the pan. Spoon about a half cup of batter on to the center of  your skillet and swirl it out to spread it a little thinner.

You can see that just like a pancake bubbles are forming and as soon as the edges are set you can flip it over. Notice they don't get brown, just a little golden. It will take just a few minutes on each side.

When finished place on a paper towel lined plate and stack.

Make sure your pan is well greased between dosas.

Although I know dosas are often served at breakfast in India we love them with fiery cilantro chutney and something hot off the grill or to sop up some Cashew Curry or Sri Lankan Lentils.

Do you enjoy dosas? Do you have a favorite recipe to link? I'd love to see it. If you haven't tried them before I'd encourage you to make these - I hope you enjoy them as much as my family does.


Wednesday, March 27, 2013

Aunt Leora's Coconut Pie!


Leora was an amazing lady. She was one of my dad's two younger sisters and mom to six of my cousins. She was my godmother and I loved her dearly. Leora was named after my Grandmother Leora and in all these years I've only met one other woman with the same name. One fun fact about my dad's sisters is that Leora and her sister Pat both married men who shared the same first and middle names with my dad. Leora shared a birthday with my brother Bobby and since it's coming up next week she's been on my mind.

Aunt Leora, Uncle Tom, Grandma Lee, Dad & Aunt Pat
About thirty years ago a friend and I put together a cookbook full of recipes from our families and friends. I love looking through it all these years later - we all eat so differently now. When I pulled it out recently and looked for her recipes I came across this Coconut Pie. I can't recall ever seeing this on the table all those years ago but coconut wasn't one of my favorites back then and I might have not noticed.

The original recipe called for milk, butter and regular flour. I believe the coconut Leora would have used would have been sweetened flakes but I used unsweetened. I knew a touch of coconut flour would sub for the regular flour easily and decided to ditch the dairy and use coconut milk and coconut oil.

I can see why this recipe appealed to Leora, as busy as she was, because it is as delicious as it is easy. Leora's pie didn't call for a garnish but since I had coconut flakes and mini chocolate chips nearby I sprinkled some on just because. My pie took much longer to bake than Leora's recipe - no doubt due to the subs.
Version 1.0 - the breakfast edition.

We had the same friends for dinner twice this week and we shared version 1.0 and 2.0 with them. I have to say the presentation of 1.0 wasn't very special looking. The soft custard was still warm and the slices were really more like spoonfuls. A yummy crust had formed on the top due to the coconut and chocolate chips I'd added. It was much like a creme brule topping. We all really loved the texture and the taste. I chilled what was leftover and "tested" it for breakfast. Amazing but still soft for pie.

Version 2.0 made us all happy. It plated up much better. The texture was better and the taste was a exactly the same. This time only one slice remained and it, too, was delicious the next day. I can't really decide whether I prefer it served warm or cold - both are yummy and completely addictive.

This is definitely going in the dessert rotation. It is sweeter than I am used to so I'll probably cut the sugar next time I bake it. It would be an easy, wonderful treat to make for Easter.

Leora's Coconut Pie
Grease pie plate with coconut oil, preheat oven to 350 degrees.

Add all ingredients below in blender container:

1 can Light Coconut Milk, I used Trader Joe's
4 large Eggs
1 cup Coconut, unsweetened shredded
1 cup organic cane sugar
1/4 cup Coconut Oil
1/4 cup Coconut Flour
1 1/2 teaspoons Vanilla
Dash of salt

Blend until well combined. Pour into prepared pan and garnish, if desired, with additional coconut and mini chocolate chips. I used Enjoy Life which are dairy free.

Bake for approximately one hour. Insert a sharp knife in the center, if it comes out clean the pie is done. Cool or chill before serving.

Enjoy!


Wednesday, March 13, 2013

Pi Day - Creamy Chocolate Filled Coconut Whoopie Pies


I love Pi Day - although Joe appreciates the math side of this "holiday" I much prefer the baking side. These whoopie pies are similar to last Pi Day's recipe in that they are coconut flour based. The cake is vanilla with shredded coconut and the filling is a delicious light and creamy chocolate sweetened with dates. 

Yes, I am very aware that my whoopie pies look much more like hamburgers than dainty, delicious desserts. They admittedly could have been a little thinner but no one complained.

This filling is amazing. It's a total knock off of a delicious chocolate mousse from Vegan-Magic that's been floating around Pinterest. Vegan-Magic is a new site to me and I've been enjoying looking at all of the wonderful recipes Adriana has posted. Please check it out.

Creamy Chocolate Filled Coconut Whoopie Pies
Preheat oven to 375 degrees - grease pan with coconut oil.
Made seven for me but next time I'd probably aim for eight.

The Cakes:

1/2 cup coconut flour
1/2 cup unsweetened shredded coconut
1/4 teaspoon sea salt
1 teaspoon baking soda
6 eggs
1/2 cup coconut oil, melted & cooled a bit
2/3 cup organic cane sugar
1/2 cup water
1 Tablespoon vanilla

Combine all ingredients and beat on low until well combined. Turn mixer to medium and give it at least three or four minutes.  

I filled fourteen wells on my pans, you might aim for sixteen for a less hamburger appearance.  Bake about 15 - 20 minutes until they are set in the center. Cool a few minutes before removing from pan and cooling on a rack or plate.

While your cakes are baking make the filling:

Creamy Chocolate Filling:

1 cup Coconut Cream (See Note)
1/2 cup (8) Organic Medjool Dates, roughly chopped
3 Tablespoons Cocoa
1 Tablespoon Vanilla

Combine all ingredients in a food processor until creamy and well mixed. There will be flecks of dates in the chocolate cream. That's deliciously okay. There will be plenty to fill the pies even if you make an extra one or two.

Note: The coconut cream I used today was from canned, full fat coconut milk. Refrigerate the can overnight and use the hardened, white layer on top. Reserve remaining coconut milk in a glass or plastic container, covered, in your fridge.

Divide filling and spread over half of the cakes, top with another cake and enjoy!


Friday, February 22, 2013

Easy Coconut Flour Pancakes!


We finally have a quick, high protein coconut flour pancake we all enjoy. I like to make six very large pancakes from this recipe. Six eggs to six pancakes means, obviously, a full egg of protein per pancake to hold us over all morning. You can make them any size you like. They reheat well in the toaster oven for an even faster breakfast the next day.

Coconut flour is my very favorite flour to work with. I really think that if I could miraculously consume gluten again coconut flour would still be my go to. It's packed full of nutrition and only a small amount is used per recipe. It does require a large quantity of eggs or flax-eggs but that makes baked goods that are nutritious and satisfying. We find that keeping protein high and carbs low in general keeps us feeling better and more focused through the day.

I have only used Tropical Traditions coconut flour and recently heard that using another brand made for some rather dry cupcakes in one of my recipes. Perhaps the cupcakes were a tad over baked, perhaps it was the flour - I don't know. But I'll stick with Tropical Traditions. When I'm making cupcakes or muffins in my Kitchen Aid mixer I rarely sift coconut flour, the mixer will take care of any lumps there may be.  When making pancakes or anything I stir by hand I sift the flour to make everything blend quickly and smoothly.

I also love Tropical Traditions coconut oil. If you are new to coconut oil you'll find their site to be really informative. You can choose from mild tasting for very strong coconut flavored oils. Coconut oil has many health benefits and just tastes so good that it is what I use most of the time to saute or bake. Even for the very occasional deep frying of onion rings! I always keep a spoonful or two of coconut oil in my cast iron pan when making pancakes. It makes for crispy edges and is a good way to get a bit more coconut oil in.

Flax seed is a great source of fiber and protein and even calcium so that's why I add some to the batter. I like to use a finely milled golden flax from Flax USA. I find huge bags of it at Costco.

Local honey sweetens these pancakes. I've used as little as a scant tablespoon to two tablespoons.


Easy Coconut Flour Pancakes!
Preheat skillet.
Makes six large or eighteen small pancakes.

1/3 cup Coconut Flour
6 eggs
1/2 cup Coconut Oil,  melted plus more for cooking the pancakes
1/2 cup Water
Dash Salt - I used either Himalayan or Grey Sea Salt
1 to 2 Tablespoons honey
2 rounded Tablespoons Flax Meal

I melt the coconut oil in my cast iron skillet while measuring all the rest of the ingredients into my mixing bowl.

Combine all ingredients until just mixed. Add another spoonful of coconut oil to your pan and melt.

Drop by spoonfuls onto hot skillet. Let cook until the entire top is covered in tiny bubbles. It won't look dry around the edges like most other pancakes. Slide a metal spatula under the pancake and turn quickly. Cook another few seconds and serve.

I love to drizzle a teeny bit more honey and add a pat of Kerry Gold butter on top (not casein free) on mine but I usually eat them plain.

Wednesday, February 13, 2013

Easy Peasy Perfectly Healthy Valentine Treats!


Last night I made my German Chocolate Bites in anticipation of a certain coconut and chocolate loving dinner guest and her mom.

Because this has been my go to treat lately and I've made a couple of other variations of these for our guests I wanted to switch things up a bit. Since it is Valentine's week I decided to try pressing the mixture into a silicone heart shaped tray I picked up at Target a couple of years ago. Each tray had fourteen hearts and the recipe filled two trays perfectly.  They popped out easily and looked a little more special this way.

So if you're looking for a naturally gluten free, grain free, vegan and refined sugar free treat you can put together for the people you love in fifteen minutes or less; this is for you.

Enjoy!

Wednesday, December 5, 2012

December Sanity Challenge & German Chocolate Bites


As I mentioned in my last post, I found out about the December Sanity Challenge from Carrie at Ginger Lemon Girl. The idea of a little accountability and support for staying sane and enjoying the Christmas season is perfect for me. There's even a facebook page to stay up to date with new blog posts and things like helpful quotes for inspiration. Love that.

So far I haven't done a stellar job at getting this going. I've been trying to get my own goals settled in my head and have read these great posts for a little inspiration:

Carrie @ Ginger Lemon Girl - http://gingerlemongirl.blogspot.com/2012/11/december-sanity-challenge-2012-peaceful.html

Cheryl @ Gluten Free Goodness - http://www.gfgoodness.com/2012/11/23/december-sanity-retreat-2012-join-us/

Valerie @ City Life Eats - http://www.citylifeeats.com/2012/12/02/december-sanity-challenge-2012-sleep-move-dance-stretch/

Iris @ The Daily Dietribe - http://www.thedailydietribe.com/2012/12/join-december-sanity-challenge-2012.html

One immediate benefit is getting to know some really great new-to-me blogs.

Shirley from Gluten Free Easily is a part of the group and I've been enjoying her ideas, too.

So anyway, my goal is to stay healthy and serene through December. Serene may be too far reaching a goal for me! So to stay healthy and not be stressed is my real goal. I know I need to work on my body and spirit and need to make specific goals.

First, I will exercise daily. My goal will be to either bike (indoors, no excuse for bad weather) for one hour or walk with my pup for at least three miles per day.

Alternatively I could play outside with my bff!
To stay healthy I will focus on unprocessed, whole foods and keep sugar to a minimum while making a deliberate exception to have a holiday treat no more than once a week. I know sugar lowers my immune system and will let a passing cold or flu bug take hold.

To alleviate stress I will also attempt to get eight hours of sleep per night. Not easy during menopause and certainly not easy with a snoring dog in our room but I will do my best to be in bed at a decent hour.

I will also set boundaries for holiday invitations and requests so I don't overdo. This may be difficult but I feel it's really necessary. My own stress transfers to my family and that isn't ever fair. This helps me to enjoy the traditions I really enjoy like a holiday craft day and tamale making (mostly eating) with Gabby and gives me plenty of time to take care of myself and my family.

And last but not least I will get back into my too-long-ignored Bible study and focus on the real reason I am celebrating Christmas.  I will finish the entire December study and I know it will be a blessing.

One thing I am adding this year is a cookie exchange that my friend Laura at http://thechroniclesofddl.blogspot.com/ has created.

It's been years since I've participated in a real live cookie exchange and this one is different.

It will be gluten free, vegan, artificial dye, flavors and preservative free and we'll use only low glycemic sweeteners.

This exchange will be much more of a challenge than the buttery, sugary Christmas Spritz cookies of years past!

We've started a Pinterest board to share ideas and I'm excited to have like minded people to exchange with!

This recipe is one I may include although I'm not sure it really qualifies as a cookie.

I think we've all made faux Lara Bars and there are dozen of recipes in the blogosphere but I really like this version.  It's such an easy recipe to make. I am not used to very sweet desserts anymore so if you are I would switch out one of the spoonfuls of coconut oil for honey. To me, the dates are plenty sweet.

Laura had made some delicious raw macaroons and shared some with me last week. I stole her presentation by packing my tablespoon very full of the fruit and nut mixture and then tapping it out into my hand. They look prettier than my usual rolled balls.

German Chocolate Bites

In a food processor combine:

1 cup Raw Pecans
1 cup Unsweetened Shredded Coconut
12 pitted Dates, roughly chopped
2 Tablespoons Coconut Oil
2 Tablespoons Cocoa
1 Tablespoon Vanilla

Process all ingredients by pulsing until the mixture looks similar to the photo on the right.

At this point I dump everything into a large bowl and press it together into a ball.

Taking a tablespoon measure pack the chocolately goodness into the spoon tightly.  Tap the treat out into your hand. If it won't release quickly tap the side of the spoon onto the side of your bowl and it should come right out.

The recipe will make 15 to 16 depending on how much you nibble as you make them.


Enjoy!

Thank you Gabby for the bff pic!

Monday, November 26, 2012

November Gratitude - Day Twenty Six

Today Laura, Marie and I had lunch at Martin's Curry Rice.

It was Laura's first time at Martin's so Martin (seated with us at right) came out explained all the options of his make your own curry bowls, told Laura what was vegan and gave her samples of his amazing vegan and gluten free sauces to help her make her choices.

I love the fact that Martin is so aware of how to keep his gluten free customers safe and happy while offering both vegans and omnivores delicious choices. The prices are so reasonable, too.

How thankful I am to be able to share delicious food with the fellowship of these special ladies.

We ordered our meals and sat down in a big comfy booth.  Marie said our blessing and we started enjoying our meals.

Marie had one of the specials today. Look how patient she is with me making her stop eating to take a photo of her and her chicken tikka!

She enjoyed it and thought it reminded her of Brunswick Stew but with an Indian flair. =D

Laura and I each did a make your own curry bowl full of garbanzos and all sorts of fresh veggies - many are local from the Western Wake Farmer's Market. The veggie choices are amazing - there must have been two dozen to choose from. I chose half mild/half hot curry sauce for a really nice sweet/hot bowl.

I love the fact that Laura has so many interests and asks really great questions. She had some fun ones for Marie. I enjoyed watching them get to know each other's hearts and learning more about each of them myself.

It was also fun to visit with Martin before the restaurant got too crowded and hear about his plans for his food truck, the special cooking classes that have been going on there and some of his special dishes. He brought out little dishes of his Vegan Shepard's Pie for each of us to sample and wow was it good. The Indian spices in the sweet potato topping were perfect.  The mix of veggies were really flavorful. It is one of the specials he made for the Western Wake Farmer's Market.

We came back to my house for a quick cup of tea and something sweet before getting back to our days. Laura got to see several of Marc and Marie's wedding photos and there was more sweet fellowship that left me feeling completely blessed.

I made a vegan, gluten free dessert that didn't turn out quite as I hoped but turned out pretty good in the end. I made my usual Lara Bar type treat in the food processor but used Trader Joe's yummy almond butter instead of nuts. Hoping it would set up in the fridge I popped it in just before everyone arrived.  It was pretty gooey with our tea.  But I put in in the freezer, took Elle for a long walk and came back to delicious, healthy freezer fudge.

Chocolate Coconut Freezer Fudge

Prepare a small glass dish (5 x 7 inches) by sprinkling 2 tablespoons unsweetened Shredded Coconut evenly over the bottom of the pan.

In a food processor, combine:

6 large pitted Dates
6 tablespoons Raw Almond Butter
6 tablespoons Shredded Coconut, unsweetened
2 tablespoons Cocoa Powder
1/8 teaspoon Vanilla Bean Powder
1/8 teaspoon Sea Salt

Process until well mixed, I could have given mine an extra minute or roughly chopped the dates in advance.

Spoon mixture carefully over the coconut so it stays in place. You can see I could have been a little more careful.  Smooth top, cover and place in freezer for at least an hour. It will be firm but not hard.

Store in the freezer if there's any left.

Marie and Laura, doesn't this look better frozen?

I wrapped up a yellow stick for Marie and Laura.

This time of year my chapped, dry skin really need protection and I love to keep them handy.

Laura came in with two very different wine glasses each filled with passion fruit!

We actually have a passion fruit vine out front but it didn't have one piece of fruit on it this summer and I've never tasted one. I think Joe and I will enjoy them in a smoothie tomorrow.

I have a Pinterest idea for one of the wine glasses in particular...maybe later this week there will be a photo if it works out the way I'm hoping.

Sweet fellowship is something I am grateful for. Women who inspire me and love Jesus with all their hearts are a joy to be around.

That one of them is such a new friend that feels like an old friend is so fun.

That one of them is my new daughter in law is nothing less than a gift.

Having a flexible schedule to sneak out for  lunch is something I also am grateful for - it's a special break from the routine and fellowship that I cherish.

Laura's vegan review of Martin's Curry Rice and our day together is up now - check it out here!

Edited to add:

Martin's Curry Rice has closed, at least temporarily.

Thursday, September 13, 2012

This week called for soothing hot cocoa. . .


This week has been a blessed respite from the oppressive heat and humidity we've had this summer but still not really cocoa weather. However, Joe has been feeling crummy this week and whenever he has a sore throat he loves to soothe it with hot cocoa.

Of course traditional hot cocoa isn't going to work for us. We gave up milk years ago when we realized that it caused chronic congestion for Joe and me and really that's the last thing you want when you're already stuffy. Sugar is about the worst thing you can consume with a struggling immune system so we skipped that, too. By subbing healthy coconut milk and stevia we had a delicious, soothing cup of cocoa that was just perfect for us.

Because all the ingredients are pantry items, we almost always have everything on hand to make a quick batch which makes it convenient for weeks like this.


Soothing Coconut Cocoa

2 Cans Light Coconut Milk (I used Trader Joe's)
2 Rounded Tablespoons Cocoa
1 Rounded Tablespoon Coconut Cream (Optional but     so good!)
1 Tablespoon Vanilla
Pinch of Sea Salt
Liquid Stevia to taste (I use SweetLeaf)

In a medium saucepan whisk together all ingredients over medium heat. I used 10 drops of liquid stevia and it was perfect for us because we don't like things overly sweet.  Using less sweetener gives the cocoa a more dark chocolate flavor, too. Adjust drop by drop to your own preference but be aware that using too much stevia will leave a bitter taste so go slowly.

If you have a stick or immersion blender you can use that rather than a whisk for a quicker, foamier cocoa.  As soon as it's all blended smoothly and hot enough for sipping pour into old favorite (and sometimes chipped) mugs and enjoy!

Friday, August 10, 2012

Joe's First Sermon Calls for Donuts!


Happily shared at Gluten Free Wednesdays at Gluten Free Easily!

Wednesday night Joe was given the opportunity to speak to his youth group on Titus, chapter 1. He's been studying and writing this sermon for a while. While it didn't go exactly as he hoped he'll be continuing with chapter 2 next week and is looking forward to it. He knows what went well and what needs to be improved. I love Joe's outlook on life and his ability to adapt and adjust. There was something really powerful about that night. A peace knowing that my little Joe is now a young man who has a heart for God. It is all I can ask for because with a heart like Joe's everything else will fall into place in life.

When Joe was little one of his favorite things were little donuts. Needless to say, allergies to dyes, preservative and artificial flavors made most donuts out of bounds.

Then we made healthier eating a priority, later went gluten free and continued to lower our sugar intake considerably leaving sugary treats like little powdered sugar donuts a thing of the past.

I wouldn't go back to the way we ate prior to Feingold but there are times you just want a sentimental treat.

So I made donuts while Joe preached that sermon because a first sermon needs celebrating. I wanted something "Joe" and had found a petite donut pan with wells for just a dozen tiny donuts - perfect for occasions like this.

Making and sharing a dozen teeny donuts makes it not quite so decadent. I made white donuts glazed with milk chocolate and dark chocolate donuts dusted with powdered sugar. Each batch took just a couple of minutes to mix and less than fifteen minutes to bake. It was very reminiscent of Easy Bake Oven baking. =D


The glaze was still warm when Joe walked in with Marc and Marie after church. We enjoyed donuts and I enjoyed hearing about his night.

Joe's Little Donuts - makes one dozen tiny donuts
Heat oven to 400 degrees - grease petite donut pan with coconut oil

In a mixing bowl add:
1/4 Cup Coconut Flour
3 Eggs
1/4 Cup Coconut Oil, softened or melted
1/3 Cup Organic Cane Sugar
1 teaspoon Vanilla
1/2 teaspoon Baking Powder
dash Sea Salt

Beat until well incorporated and fluffy. Divide into each donut well evenly - each well held approximately one tablespoon. Bake for 15 minutes or until very slightly golden brown. Cool slightly. 

Meanwhile, make your glaze. In a small pan over very low heat add:

1/2 Cup All Natural Milk Chocolate Chips (like Ghirardelli)
1/2 teaspoon Coconut Oil Stir constantly until melted and creamy.

Swirl the donuts one at a time into the chocolate glaze on the flatter side to get more coverage. Let set and cool for as long as you can wait.

Chocolate Variation:  Add 1/4 cup cocoa to batter and bake exactly as above.  I used only 1 1/2 teaspoons of powdered sugar to garnish and dusted the rounded side instead.

Enjoy!