Showing posts with label Bread. Show all posts

Monday, February 27, 2017

Almond Flour Scoop Biscuits

In my attempt to greatly increase beneficial veggies, herbs and spices and lower the sugar and carbs in my diet, I am revisiting some favorite old recipes and sites. One of my very favorite sites is Elana's Pantry. Elana has beautiful, simple to follow recipes using some of my favorite ingredients like almond flour and coconut flour. She has been such a great inspiration and made our gluten free living so much sweeter - especially her gluten free cupcakes!

These days I find that my veggie meals fill me up initially, but my tummy starts to rumble well before my next meal. Adding a little more low carb protein helps balance things out for me. Elana's biscuit recipe is relatively low carb and easy to make, but with my energy levels waning these last few weeks between surgery and the flu I found a way to make them even easier and lowered the carbs further.

While I loved the flavor of coconut oil in Elana's recipe, the coconut oil I have on hand is very strong. I love it at breakfast but it kind of clashes with some meals.

Switching out to an avocado oil gave the finished biscuits a really mild flavor and the same nice texture. Cutting the sweetener out completely still left a delicious biscuit. Adding all the ingredients to the same bowl and scooping each biscuit with a baking scoop (ice cream scoop) cut washing and prep time in almost half. The scoop makes a drop biscuit much more uniformly. Baking them in a 9x13 glass pan that I can store in the fridge meant one less pan to wash, too.  I'm not sure if necessity is the mother of invention or exhaustion is. Either way, it's a win.

I've been using Blue Diamond Almond Flour since our Costco started carrying it. I know that isn't a brand Elana used to recommend but it has worked very well for me. I've also made the recipe vegan because of all I am reading about flax meal again. Still great texture but I'll include the egg/flax information so you can decide what works best for you.

The biggest issue I have with nut flour baking is the calorie content. It is high, but one biscuit is satisfying and makes a big mug of miso soup a meal. It rounds out a smoothie or a salad and holds me over. I just have to resist the temptation to eat several.

Almond Flour Scoop Biscuits

Preheat oven to 350 degrees.


In a large bowl stir together:

1/2 cup Avocado Oil
4 Flax Eggs (4 Tablespoons Golden Flax Meal plus 6 ounces water OR 4 large eggs for non-vegan biscuits)
1 teaspoon Salt - Sea Salt or Himalayan pink are my favorites
1 teaspoon Baking Soda

Once well combined, add:

5 cups Almond Flour

Mix well and don't worry about over mixing like traditional flour. These will still be moist and tender. Once fully mixed take your handy scoop and scoop out 12 to 14 nice round biscuits onto a baking sheet or right into a 13x9 baking pan. After scooping I usually give the round biscuits a little push with the back of the scoop to flatten slightly as in the photo above. Both pans have worked perfectly and whether you leave them round or flatten they bake pretty much the same.

Either pan, bake at 350 degrees approximately 15 - 20 minutes - a bit longer in the baking pan and a bit shorter on the baking sheet. They'll be a light golden when done as in the photo on the right. Be sure to let them cool about twenty minutes or they might be crumbly as in my photo at the top. I store mine a few days in the fridge and bake about once a week. If I want a warm biscuit I just pop it in the toaster oven for a couple of minutes.

Enjoy!

*Or 4 Large Eggs for Non-Vegan Biscuits

Wednesday, June 4, 2014

Olive, Garlic and Herb Dipping Oil!


If you have tried Laura's Garlic Herb Dip once, I bet you've made it several times. I still don't have the courage to add as many cloves of garlic as Laura does but we are hooked on that stuff.

It is absolutely amazing spooned over freshly baked crusty bread, but I love to drizzle it over grilled veggies, too.

The beauty of the recipe is that it really isn't a recipe. You just take a handful of fresh herbs of your choice and chop them up with some garlic, drizzle olive oil over the top and season.

Easy peasy.

Last week I had made a beautiful, crusty double loaf of Luce's New Italian Bread.

Charles Luce makes gluten free artisan bread so easy. I tweak the recipe ever so slightly and double it, baking it in a covered casserole instead of his baking bags. It comes out just right. The double sized loaf works better for my family.

We were getting ready to grill some veggies when I remembered Laura's dip.

I went outside to pick herbs and there just wasn't enough to make a nice amount so I grabbed a can of Santa Barbara Olive Company Olives. These are my favorite olives so only about 2/3 of the can made it into the dip. The texture and size of these olives are so perfect and they have several olives that are gluten free. A bonus is Santa Barbara is where my mom's family lived when I was young. The old mission on the label just makes me happy.

The result was really phenomenal. The olive texture and salty flavor worked so well with the garlic. The herbs I had on hand were fresh basil, mint, oregano and a tiny bit of chives. Any fresh herb you love works and the more flavors, the better. Because Laura loves olives I felt she'd approve of this addition. =D

We rounded out dinner with a roasted beet salad and it felt like the perfect summer meal.

Again, this really isn't a real recipe, but here's what I did.

Olive, Garlic & Herb Dipping Oil:

I chopped a handful fresh mixed herbs finely with 3 cloves of garlic.

When they were chopped I added about a cup of drained jumbo black olives and roughly chopped them.

I put the mixture in a bowl and covered with Extra Virgin Olive Oil. I used freshly ground Himalayan Salt, Black Pepper and Hot Hungarian Paprika to season the dipping oil. We have kept extra dipping oil two or three days in the fridge.

Happily shared on Gluten Free Wednesdays over at Gluten Free Easily!

Enjoy!


Monday, August 19, 2013

Luce's Gluten Free Artisan Bread Mixes!

Saturday morning Joe and I headed out to the Gluten Free & Allergen Free Expo together. Our time was really limited and I wanted to make sure we checked out some new-to-us products.

The night before Chris and I had the pleasure of attending a blogger dinner at Bella Monica where we got to know some very interesting people. I want to than Pam Jordan of I'm A Celiac for including me. I hoped to introduce Joe to a couple of the people I'd met at the dinner, especially CPT Ben Adrasik.

In the coming days I will tell you about Moon Rabbit Foods, Stacie Moor of Nature's Radiance Healthy Cosmetics, This is Grub Water Kefir and CPT Ben Andrasik who has written the book Gluten Free in Afghanistan but tonight's post is all about Luce's Gluten Free Artisan Bread Mixes.

Joe and I nearly walked past Charles Luce and his table of artisan bread. We backed up and tried a sample and I was floored. The crust is chewy and the crumb is tender and it tastes like real bread. It's not just really good gluten free bread - it's really good bread period. We tried samples of each of his flavors - New Italian, Bold Buckwheat Premium, OMG Flatbread and Classic Sourdough. (That's the Classic Sourdough above, just minutes after I pulled it out of the oven.)

I purchased three bags of bread mix and I'm glad I did because it will hold us over until our first order arrives. Yes, I placed an order right after sampling our first loaf of bread - it's really that good.

What is really nice is that everything you need to bake a wonderful, crusty loaf of bread is in that bag. The baking flour, dusting flour (doesn't it give the crust a great, authentic look?), parchment, baking bag and precise, easy to follow instructions are all included.

All you have to do is measure one cup of warm water, mix it up, form it into a loaf, slide the loaf into the baking bag and let it rise a bit before baking. Charles has done all the work.

I was concerned it might be hard to slip the dough into the bag but the parchment support works perfectly.

The rice flour for dusting is perfectly measured and easy to sprinkle on.

The baking bag keeps just enough steam on the loaf for a perfect crust.

I love that the ingredients are simple and natural and while I do make my own flour mixes and bread I bake I just think this is a genius product and look forward to trying another flavor.

What I really look forward to is my French hubby getting to enjoy a crusty loaf of bread when he gets home. He can eat anything but chooses to eat gluten free at home to keep the rest of us safe. This is his kind of bread and can't wait for him to try it. I ordered the bulk mixes which lowers the price per loaf to about half making it really reasonable for a good loaf of gluten free bread.

Try it and if you do, please let me know how you like it!


Thursday, July 18, 2013

Gluten Free Blueberry Muffin Bread!

It's good to be a ChaCha for so many reasons. I loved the name the very moment my Ev gave it to me three years ago and I adore that his sweet and sassy little sister yells "my ChaCha" and comes running when I pick her up from camp. Ev will tell you it is a very good name and he's excited (and just a little proud) that our soon to be grandbaby Aiden will be calling me ChaCha when he's old enough.

Being ChaCha has it's perks, too!  When Ev and Ollie went blueberry picking at Herndon Hills Farms last week, Gabby gave me a huge bag of the most gorgeous, freshest blueberries I've seen in a long time. While I haven't been to Herndon Hills Farms, Gabby vetted the farm and they use only natural materials approved by the OMRI (Organic Materials Review Institute) and are working towards organic certification. Gabby's photos show how beautiful the farm is, too. Lucky for me, Evan and Ollie can pick a lot more berries than they can eat! Can you see that Ollie can hardly hold up her own bucket!?!


I wanted to make some gluten free coconut flour muffins, similar to these but with a splash of lime juice and chock full of blueberries. Since I had just washed the loaf pan and it was still on the counter, I used it instead of the muffin pan and liners, although this recipe should make twelve muffins easily.

And please take a moment to read Pam's blog at I'm A Celiac on the Gluten Free and Allergen Free Wellness Event next month in Durham! It's a wonderful blog to sit and explore when you have some time. In this post, Pam's got lots of information and some really helpful tips for first time visitors. It would be wonderful to see lots of friends there!


Gluten Free Blueberry Muffin Bread

Heat oven to 400 degrees
This lemon "glaze"? Will tell more soon!
Grease a Pyrex loaf pan with Coconut Oil 

1/2 cup Coconut Flour
1/4 teaspoon Sea Salt
1 Teaspoon Baking Powder
6 Eggs
1/2 cup Coconut Milk, canned
1/3 cup Sugar
1 Tablespoon Lime Juice
1 Tablespoon Vanilla

Combine all ingredients in bowl of Kitchenaid mixer on low speed to combine.  Increase speed to medium high for two minutes or until smooth. 

Gently mix in.

1 Cup Fresh Blueberries 

Pour into greased pan and bake for approximately 50 minutes until golden brown. You can use a toothpick to test the center, but you'll know it's ready when you gently press on the center of the loaf and it feels firm.

Enjoy!

Sunday, April 28, 2013

Delicious Dosas!


This is a post that has taken ages to finally get on the blog.  As difficult as it has been to get posted is as easy as they are to make. Dosas are a uniquely Indian flatbread and come in many flavors and combinations of rice and lentils - some thick and the size of pancakes and some crepe thin, crispy and larger than dinner plates. These dosas are made by soaking and grinding rice and lentils into a smooth batter and then fermenting the batter to give it a delicious tang - a bit like sourdough bread. This makes them a good starting point for traditional fermented foods. I like to make them this time of  year when my kitchen is warmer and fermenting is quicker.

Several years ago I was part of an online health board and one of my board-mates was a lovely Indian woman named Sangeetha. When she learned that I love Sri Lankan and Indian food she asked if I had ever made dosas before and proceeded to teach me by email. She taught me a plain version and one her kids called pizza dosas. Today's post is the plain version and I'll post the pizza dosas soon.

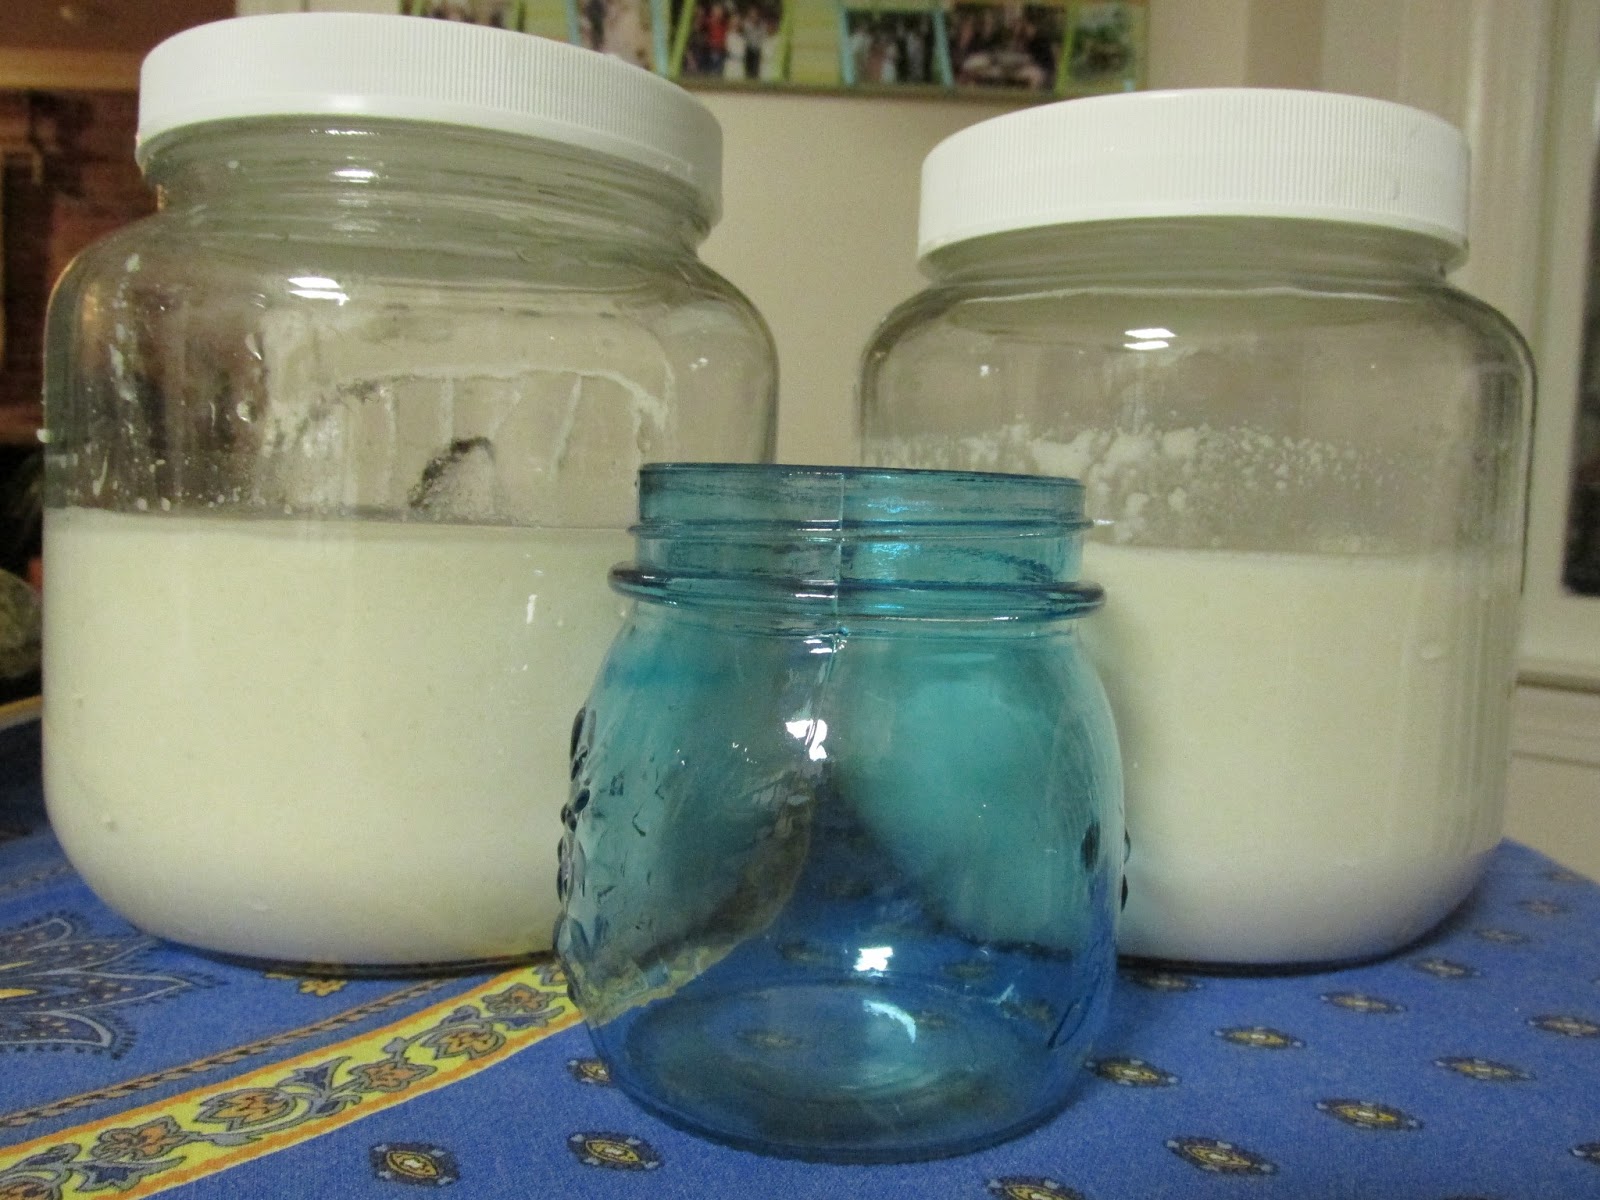
While the process is super simple you need to plan in advance because you'll soak for one day and ferment overnight. You can see that I'm soaking the rice and lentils in separate jars and each jar has a pinch of fennugeek seeds. The jars look a bit cloudy but the rice and lentils were each rinsed very well.

The lentils look almost white yet they are called black gram dal or urad dal and can be found in every Indian or Asian market in our area. You can use any lentil, only the color will really be affected.

After twelve hours the jars are rinsed with fresh water and left for another twelve hours.  At this point some of the water is drained and it's time to grind the soaked rice and lentils. I have used a regular blender, an immersion blender and my Vitamix. The Vitamix obviously grinds faster, but all will work. You'll need enough water in the jar to keep the mixture liquid - like a thick cream or pancake batter.

Once the mixture is blended, pour it back into clean jars and put the lid(s) on loosely. I've put the blue jar between the two jars just to give you perspective on the fermentation. You can see the batter is almost as high as the blue jar here. I set the jar out about 9:00 p.m. on Friday.


Here's what it looked like by mid-day Saturday. You can see the batter is naturally fermenting and has grown considerably. You can also see air bubbles throughout the jars letting you know the fermentation is complete.

Do keep an eye on your jars as they start to expand, as they can easily bubble up over the top!

Next step is to add a bit of salt and get cooking! One key ingredient is your cooking oil. I only use coconut oil for cooking my dosas. In fact, it's the most used oil in my kitchen.

The pan you use is very important. A stainless steel skillet will get sticky no matter how much oil you use. I don't have non-stick pans because I'm concerned about the chemicals leeching into our food. The only pan I use for dosas (and making tortillas) is my cast iron pan. A well seasoned cast iron pan is better than any non-stick pan I've ever used.

Delicious Dosas

Ingredients:
1 cup Rice - I use Organic Basmati
1 cup Lentils - I use Urad Dal or split Black Gram Lentils
Pinch of Fennugeek seeds
Sea Salt - added after fermenting
Coconut Oil for frying

Using one jar for the rice and one jar for the lentils, pour each into their separate jars and rinse thoroughly under running water being careful to not let the rice or lentils flow out of the jars as you pour off excess water. When the water runs clear fill each jar with filtered water and let sit 10 to 12 hours with lids on.

Rinse and refill each jar, put the lids back on and let sit for another 10 to 12 hours.

Now that the jars have sat out nearly a full day you can start your batter. Pour off some excess water, leaving the water level just about even with the rice and lentils. I actually doubled the recipe in the photos above so I couldn't fit both jars into my blender at once but you should have no problem doing so. My Vitamix plows through the mixture quickly but you may need a bit more water if you're blender is having trouble mixing the rice and lentils into a batter.

Just like a pancake batter is thicker than a crepe batter the thickness of your dosa batter will affect the thickness of the cooked dosa. I have better results with a pancake consistency.

Now put your batter back into the clean jar(s), put the lid on and give it some time to ferment and get bubbly. I put my jars out about 9:00 in the evening and by lunch time the next day that had risen and were nice and bubbly. Since I wanted to make them for dinner I added a teaspoon of sea salt to the mixture and popped it in the fridge until dinner time. This slows down the fermentation. The batter will keep a couple of days in the fridge.

To cook:

Heat a cast iron pan on medium heat and add a spoonful of coconut oil to the pan. Spoon about a half cup of batter on to the center of  your skillet and swirl it out to spread it a little thinner.

You can see that just like a pancake bubbles are forming and as soon as the edges are set you can flip it over. Notice they don't get brown, just a little golden. It will take just a few minutes on each side.

When finished place on a paper towel lined plate and stack.

Make sure your pan is well greased between dosas.

Although I know dosas are often served at breakfast in India we love them with fiery cilantro chutney and something hot off the grill or to sop up some Cashew Curry or Sri Lankan Lentils.

Do you enjoy dosas? Do you have a favorite recipe to link? I'd love to see it. If you haven't tried them before I'd encourage you to make these - I hope you enjoy them as much as my family does.


Monday, February 25, 2013

Monday Mix - Brit Bits!

Last night was one of those not nearly enough sleep nights for me. Nights like that generally result in carb craving days and today was no different.

So I grabbed a bag of Pamela's Pancake and Baking Mix from the top shelf of the pantry.

Pamela's mixes are something I don't use weekly because I try to focus on whole foods that are naturally gluten free, but I always keep some on hand.

When we have non-gluten free friends over these mixes are perfect for keeping everyone happy. They do not taste or feel gluten free at all. I've mentioned Pamela's a few times here.

I tried to head it off the carb cravings with a healthy breakfast of kale and eggs with a little smoked salmon on the side. Such an easy protein breakfast - it's just one egg and a large handful of kale processed/pureed together and cooked just like scrambled eggs. Yummy and indulgent, but after a while I still needed to bake. I used Joe as my excuse for a carb fix. If I'm baking for Joe then it's got to be okay, right?

Joe really enjoys English muffins and biscuits and it seemed I could combine the two for something fast, easy and tasty. The dough mixed up in moments. I added some flax for more fiber and nutrition and kept the dough on the savory side by using extra virgin olive oil. Giving each side a quick browning on a hot cast iron pan gives them the look of an English muffin but the texture isn't too far from a biscuit even with all the flax meal. Since this recipe makes just six they won't be around too long. After a quick debate we named them Brit Bits.

Brit Bits
Preheat oven to 400 degrees and cast iron pan to medium heat on stove top.
Line baking sheet with parchment.
Makes six.

2 2/3 Pamela's Pancake and Baking Mix
3 Tablespoons Flax Meal
3 Tablespoons Oil (I used EVOO)
1 Cup Water

Divide dough into six portions and roll into balls, flatten slightly.

On a hot cast iron pan (mine is an over sized skillet so I could easily do three at a time) cook about a minute or two, flip and cook one or two more minutes - you just want them to have a nice golden color on each size.

Place each bit onto your parchment lined baking sheet as they are browned.

Bake approximately fifteen minutes - they'll feel pretty firm but not hard to the touch.  Let cool slightly.

Slice and toast as you would an English muffin. They were perfect with butter and jam for a mid-morning treat. Joe says they're even good plain.

Enjoy!


Thursday, February 14, 2013

De'Lure' Desserts & Bakery Delivers!


Yesterday I had the nicest gluten free surprise! Ragan, of De'Lure' Desserts & Bakery was making a Valentine dessert delivery to Marie nearby and surprised me with a complimentary baguette.

Ragan is the talented gluten free baker who makes the wonderful gluten free focaccia and chocolate raspberry amore cakes served at Bella Monica. I've gone on about them in our Bella Monica posts before. Being able to go out for a wonderful Italian meal and be able to order nearly anything on the menu safely is such a treat and Ragan works beautifully with the Bella Monica team to make that happen.You can find her goodies at other locations seasonally such as Pullen Park and Koka Booth Amphitheater so follow her on Facebook to keep up to date.

Ragan also did the beautiful desserts for Marc and Marie's wedding and she is absolutely wonderful to work with. She asked lots of questions and made sure she had Marie's vision. She spoiled us with samples to make sure Marc and Marie knew just what would be served and were happy with their choices.

Marie's aunts and cousins beautifully arranged the dessert table, decorating the cake with fresh flowers. It was the most beautiful presentation and everything was absolutely yummy and perfect.

Ragan made the wedding cake, French macarons, mini cupcakes and amore cakes and everyone loved everything. Raved about them, actually. This was big. Really big. Why? Because everything at this wedding from appetizer to entree to cupcake was gluten free and delicious.

Should you be so lucky to have her cater your wedding desserts be sure to order more than you think you will need because they will be quickly inhaled by your happy guests.

But back to the baguette! Ragan's baguette is not only gluten free, but also corn free, peanut free and vegan.  And did I mention delicious? The kind of delicious your non-gf friends will also enjoy if you are generous enough to share with them.

Because I was the only one home last night I saved it until today to share. And, since we waited a day to sample the baguette, I can't speak to how it tastes the day it is baked but can tell you it was wonderful today.

Joe wanted black bean hummus and veggies at lunch and the baguette was perfectly suited. I sliced it thinly and toasted it for our meal. We both loved the taste, texture and crunchy crust. It dunked into our hummus and held up well.  No typical gluten free crumbles here.

We pretty much inhaled every crumb of every slice I'd toasted. We saved some for Chris to try when he gets home tonight but I will be surprised if it makes it that long.

Ragan says she likes to slice, toast and serve as Bruschetta which sounds great. Chris and I love Laura's Garlic Herb Dip and I think these baguette slices will be perfect dipped into that garlicky delight. It was also amazing with a small smear of butter.

Ragan charges $5.50 per loaf and her delivery charge in the Raleigh area is only $5. I'm placing an order soon because looking through the wedding photos makes me want one of those delicious French Macaroons.

Thank you to Katelyn McKay Photography for your beautiful dessert photos.


Friday, January 27, 2012

Leah's Pecan Paleo Bread


Last night I was able to make this recipe from my friend Leah's Practicing Joy blog. Check out her blog and try it soon. This was my breakfast this morning. Pecan Paleo Bread and a couple of slices of yummy Gouda. Absolutely delicious together!

While I really love this recipe made with almond meal it's incredible made with pecan meal.  Pecan meal is a snap to make in your food processor - just be sure to pulse it until until you have a soft meal but not so long you end up with pecan butter.  Almonds are a stage 2 food in the Feingold world - meaning they are higher in salicylates.  Pecans, however, are a stage 1 or lower salicylate and perfect for people with a salicylate sensitivity.

Right out of the oven you will notice a beautiful dark rye bread color.  I sliced into it while it was still hot and it was great plain and with a little smear of butter.  Joe likes the almond version but really enjoyed this. I think the texture is more delicate than the almond version.  The pecan flavor is mild and wonderful paired with cheese.

So after all the sampling I've done it's time to leash up Elle and take her for an extra long walk to the park today! Elle will thank you Leah!

Enjoy


Friday, September 2, 2011

Elana's Paleo Bread - Yum!


I need to share this recipe now.  Elana of Elana's Pantry always has great recipes but this bread is one of her best in my opinion.  It's hearty, nutritious, moist and delicious.  Easy, too.  

Elana's recipe calls for almond flour and even though I only had almond meal in the pantry I went ahead and gave it a try. The original recipe calls for a smaller pan than I have so I doubled the recipe and made one very large loaf using a standard size pyrex loaf pan. I had to bake it several minutes longer because of the size but it came out perfectly.  With the almond meal, coconut flour, flax meal and all those eggs it's just packed with protein.  A thin toasted slice spread with peanut butter was a really satisfying breakfast. The sandwiches we made with it were wonderful. It's great with butter and it's just perfect plain, too.  Pretty impressive for any bread, let alone a gluten free bread.

Right now I'm working on gluten free graham crackers for end of summer s'mores now so it's back to the kitchen for me. =D 

Monday, July 25, 2011

Gluten Free Potato Rolls


This roll uses potato starch rather than the tapioca starch I so often use. A couple of friends have commented that tapioca starch seems to cause digestive issues for them and I wanted to find an alternative. For us, it’s an easy, gluten free, grain free ingredient I can buy inexpensively and easily at my local Asian markets. When I realized I had a bag of potato starch in the pantry I decided to experiment this morning. Potato starch is usually just a shelf away from the tapioca starch at my markets and is just about the same price.

Potato starch has a powdery, fine consistency out of the bags similar to the tapioca starch.  The dough texture was a bit dryer than the tapioca dough and therefore a little easier to roll into balls without sticking to my hands.  I used a mild whole milk mozzarella finely shredded and no seasonings so there was no overt cheesy taste (not that that is ever a bad thing) and my sample was delicious alone and with butter.  The texture is really light and airy – almost like a drop biscuit.  I’m looking forward to trying them with blackberry jam in the morning if there are any left after dinner.

Gluten Free Potato Rolls
Makes 13
Bake at 375 until golden – about 15 minutes in my oven.

Mix together until well incorporated:

2 cups potato starch
2 cups finely shredded whole milk mozzarella
3 eggs
½ cup oil (I used grapeseed but any mild oil or melted butter will work)
1 ½ teaspoons baking powder

Roll into balls about the size of a golf ball and place on a parchment lined baking sheet.  Bake until golden.

Enjoy!

Quick Update Edit:  A few rolls did make it to the morning.  Joe sliced at toasted his for mini breakfast sandwiches.  Mine were heated and slathered with butter and blackberry jam which was great with green tea.   We all agreed they were very much like biscuits and it's nice to have a quick and easy recipe again.  

Tuesday, March 29, 2011

Easy Gluten Free Homemade Veggie Burgers


Remember Monday’s post when I said I’d doubled the rice and lentils to make veggie burgers? Well, here they are. I love Sunshine Burgers* and usually have a box in the freezer for an almost instant lunch or dinner.  But when I’m out, I make my own.  This is one of the fastest and least expensive recipes you can make and its a great vegetarian protein combination, too.

For this recipe I had set aside approximately three cups each of the lentils and the rice. I added the chopped veggies and seasonings and used an immersion blender to get the texture I wanted. Pushing the blender down through the mixture several times the mixture was mostly pureed but still had some whole rice grains and lentils for texture. This is a really basic recipe you can change with your favorite herbs and spices.

Veggie Burgers
Preheat oven to 400 degrees
Line baking sheet with parchment paper

3 cups cooked brown rice
3 cups cooked lentils
2 Tablespoons olive oil, divided
½ cup grated carrots
¼  cup minced onion
1 clove minced garlic
Dash of salt, pepper and cayenne

Place everything but 1 Tablespoon of olive oil together and 1) blend with immersion blender or 2) blend with food processor or 3) mash with a manual potato masher.  Do not over blend or process as you want some texture.

Shape one cup spoonfuls of mixture into patties on the parchment paper. Drizzle about ½ teaspoon of olive oil on top of each patty and brush over top.  Bake until browned – about 25 minutes in my oven.


The sandwich rolls were made with a one loaf-sized package Pamela’s Bread mix.  I used the standard bread recipe and shaped it into six rolls. The dough is very sticky, so smooth it over with very wet hands to get a nice, smooth bun shape.  They also took about 25 minutes to bake.


Joe is a purist and had a plain cheese veggie burger.

Mine was topped with a roasted red pepper and eggplant spread and I added a handful of fresh baby spinach. So yummy!


*Why Sunshine Burgers?  Because they are not only gluten free but soy free and non-GMO. They're the only brand I've found that meets our needs and they just taste great, too.

Like Sunshine Burgers homemade veggie burgers can crumble easily so transfer them from baking sheet to bun with a spatula. You can purposefully crumble them when making wraps or adding them to nachos. 

Sunday, March 20, 2011

Grilled Cilantro Chicken Burgers on GF Jalapeño Cheese Rolls


While today ended up being several degrees cooler than the last few gorgeous sunny days; it was still a nice enough evening to fire up the grill.  This is a recipe I created a few years ago and posted on a health board I used to frequent. I had long forgotten about it.  Happily I came across some old recipe notes recently and recreated the recipe.  Adding a shredded carrot to the original recipe gave the patties a bit more color and flavor.

If my Whole Foods carried raw ground chicken on a regular basis I would make these much more often.  As it is I find it every few visits.  I don't buy ground chicken anywhere else because every other store's ground chicken has something added to it.  Added flavors can mean gluten or artificial flavors or preservatives and are best avoided.  Ground chicken is great to cook with. It's lean and light I prefer it to ground turkey hands down.  When made into burgers there is  no need for any fillers to hold them together.  This recipe is full of veggies and flavor and is really great on freshly baked Jalapeño Cheese Rolls.


I topped mine with homemade salsa and avocado slices and loved every bite.  Other toppings available were sliced red onions, tomatoes and ketchup.  Every one of us dressed ours up slightly different and we were all quite happy.

Grilled Cilantro Chicken Burgers on GF Jalapeño Rolls
Makes 8 large chicken burgers

2 lbs Raw Ground Chicken Breast
1/2 cup Cilantro, finely chopped
1 large Jalapeño, finely chopped
1 medium Carrot, finely shredded
1/4 cup Red Onion, finely chopped
dash if Garlic Powder
dash of Black Pepper, freshly ground
1/2 teaspoon Himalayan salt

Mix the raw chicken with all the rest of the ingredients.  Very clean hands are the fastest way to mix everything thoroughly. 

Shape into eight burgers and grill on medium heat until cooked through and lightly browned. These are just as easy and just as flavorful when cooked on my cast iron frying pan.  When I cook them this way I use a little bit of coconut oil on the pan because the chicken is so lean.

The best part of tonight's dinner are the leftovers for the week.  There are still four burgers and half a dozen rolls for fast meals when time is short - all I'll have to do is make a quick salad. Cooking in quantity is such a time saver.  It takes only moments longer to double most recipes and in doing so you can literally save hours per week. 


Hope you have a great week.

Saturday, March 19, 2011

Banana Coconut Bread with Chocolate Chips

Here’s an easy high protein, high fiber yummy banana bread recipe. Coconut and Almond flours are both grain free for those who have trouble digesting grains.  Adding the large quantity of eggs boosts the protein even higher and keeps my local farmer happy because I buy so many each week!  The sugar is kept to a minimum because of the sweet bananas and chocolate chips.  My family prefers banana bread without chopped nuts but if your family enjoys them feel free to throw in your favorite.

I love having things like our breakfast cake, chocolate coconut bars or this banana bread around for quick breakfasts.  A slice is so much more satisfying than a processed gluten free piece of toast or waffle and the protein will hold you over much longer.  They are perfect for an afternoon treat after running through the sprinklers, too.  Just ask my favorite neighbors!


Banana Coconut Bread with Chocolate Chips
Preheat oven to 375 degrees
Makes 2 loaves.
Prepare pans by lightly greasing.

4 Bananas, very ripe and mashed
6  Eggs
3/4 cup Tropical Traditions Coconut Oil
1/2 cup  Tropical Traditions Coconut Flour
1 lb. Almond Meal – Trader Joe’s
1/4 Cup Organic Cane Sugar
1 t Baking Powder
2 cups Chocolate Chips

 Mix all ingredients except chocolate chips until very well incorporated; stir in chocolate chips.

Spread batter into two greased standard loaf pans and bake for 50 minutes.  Alternatively you can spread the batter into into an ungreased 9 x 13 pan and bake at 375 for 40 minutes.   The crust will be brown and the bread will feel a bit soft but a toothpick inserted in the center will be clean.


Tuesday, March 15, 2011

Leah's GF/CF Sandwich Rolls

Leah, this is as close as I can come to home delivery.  These rolls are an adaptation of this cheese roll recipe. The cannellini beans add bulk to the batter and lots of fiber and protein, too.  They help replace the large amount of cheese in the original.   I upped the oil a bit because cheese adds a lot of fat and in my first attempt I found the rolls dried out almost immediately. These are much softer and have a nice texture.  They took just about ten minutes to prepare and less than thirty to bake. 


I think the Daiya Mozzarella style would work well in this recipe using olive oil and a tablespoon of oregano.   Hope your family enjoys them.

Leah’s GF/CF Sandwich Rolls

Preheat oven to 375 degrees
Line baking sheet with parchment paper
Make 9 rolls


In Vitamix or blender combine:

1 15.5 ounce can cannellini beans, drained
2 large eggs
½ cup grapeseed oil (use any approved mild oil)

Scrape with spatula into a mixing bowl containing:

2 cups Tapioca starch
4 Tablespoons finely milled golden flax seed
1 teaspoon baking powder
1 cup Daiya Cheddar Style Shred cheese substitute.

Mix thoroughly to blend.  Let batter sit for 10 minutes to allow flax to absorb and thicken batter.

Spoon batter into nine rolls on parchment and bake for 20 to 25 minutes until golden. 

Note:  The rolls in the photo were made immediately upon mixing and are flatter than the rolls that were made when the batter was allowed to thicken.  Time was short and I was losing light for photos. =D  

Saturday, February 12, 2011

Easy Hummus Pitas

  
ChaCha's kitchen was a busy place this afternoon. After lunch dishes were cleaned up, it was time to make some Kombucha and start a batch of coconut milk kefir.  (Coconut milk kefir makes great dairy free, probiotic rich smoothies.)  Next on the agenda, cheese bread baked in a 9 x 7 rectangular casserole. While I was making the cheese bread I decided to make a pita type bread. As I thought about it I decided that a hummus based bread would be full of protein and flavor.  So starting with the cheese bread recipe since all the ingredients were still on the counter, I made a basic hummus recipe thinned with extra olive oil to use instead of cheese and tweaked the egg/flax amounts. The dough was soft, easy to work with and smelled great.  

This is a really fast and easy recipe.  Preparation took ten minutes and baking about twenty minutes.  These pitas would not only make great sandwiches but would be good with just about any meal.  I think mini falafel sandwiches could be a fun appetizer.  

Preheat oven to 400 degrees and prepare two large baking sheets by lightly oiling.

In a food processor, blender or Vitamix, puree:

1 can organic garbanzo beans with liquid
¾ cup olive oil
2T lemon juice
2 large eggs
4T finely milled golden flax
1T sunflower seed butter
1 clove garlic


In a large bowl mix hummus mixture and:

1 lb bag tapioca flour
1T baking powder
½ t sea salt

Mix until well incorporated.

Using lightly oiled hands to shape the breads divide into 12 pieces and shape into circles about 1/3 inch thick.

I baked them for ten minutes, flipped them over and baked for about ten more.  They were soft and easily sliced.  We ate quite a few of them plain and dipped in olive oil.


I had to laugh at how much my sons loved them because neither of them likes hummus.  I think we've found a new favorite.