Showing posts with label Main Dish. Show all posts

Wednesday, March 25, 2015

The Bee's Knees Gnocchi!

Kecia Johndrow is someone I "met" online several years ago through the Feingold Association. Four years ago she opened her own gluten free bakery, Bee's Knees Bakeshop in Cedar Park, near Austin, Texas. Not only does she make beautiful baked goods like cakes, pies, brownies and cake balls; she also serves breakfast and lunch.

Now Kecia has written her first e-cookbook, Gluten Free is the Bee's Knees, A Bee's Knee's Cookbook.  A mutual friend let me know about the e-book and I bought it immediately.

The variety of recipes is great. Soups, appetizers, sides, dips, casseroles, breakfast items, entrees from Mexican to Cajun to Italian, desserts and more are included. Kecia has included answers to some frequently asked questions and shopping tips, making this a great resource for anyone newly gluten free.

She graciously has allowed me to share one of her entrees here for a little sneak peek. I had a hard time choosing because everything sounded really good.


Ultimately, I chose Gnocchi because it's one of my favorite comfort foods.  Kecia recommends topping them with a marinara sauce for a GFCF meal.  Since we do some dairy I chose to serve them drizzled with Laura's Garlic Herb Dip and a sprinkle of Asagio cheese.

I am certain mine are not as pretty as Kecia's but oh my goodness, they were delicious! I used brown rice flour and made them a little larger than Kecia recommended so they took a couple minutes longer to cook. Chris and I absolutely loved them and went through nearly half a batch between the two of us.

Here's Kecia's recipe, straight from her book:

Try it, I think you'll enjoy!

Happily shared on Gluten Free Wednesdays thanks to Linda at The Gluten Free Homemaker.

Wednesday, July 9, 2014

Honey Sriracha Madness

So this Honey Sriracha Madness is Marie's fault entirely. You see, Marie, Marc and Aiden were running in the grocery store as Joe and I were running to our car a few weeks ago. 

Marie mentioned she was making Honey Sriracha Chicken for dinner that night and I was intrigued. A quick check of Pinterest later that night gave lots of variations. All super simple and I never did go back to look at a recipe.

And since it's been way too long since Aiden has made an appearance on the blog I am sharing this photo our amazing Gabby took at his dedication last month. It's hard to believe he's going to be one in just under a month!

But back to food. So why am I giving you three? Because it was a great excuse to put up a pic of Aiden and because it's really good! I love to play around with a good recipe and make it my own varying ingredients to my family's tastes. You can adjust the honey and Sriracha to your taste to make it sweeter or milder or scorching hot! 

For the Honey Sriracha Chicken Bowls, I just let one and a half pounds cubed chicken simmer in a tablespoon of coconut oil. As the cubes were barely cooked through I added about 1/4 cup honey, about a tablespoon Sriracha and a dash of lime juice and garlic and simmered until the sauce was thick and caramelized but not dry.

Stop when you like the consistency - really saucy to drizzle over the rice - simmer a little less time. Super caramelized, go a little longer.

It was amazing over a bowl of steaming rice with some fresh herbs sprinkled on top. We used mint, cilantro and basil for a Thai-inspired flavor.


Our favorite vegetarian version is this delicious Honey Sriracha Mushroom Sauté.

It's super simple. Clean and quarter a pound of mushrooms. Sauté mushrooms in a medium skillet in one heaping tablespoon of honey and one heaping teaspoon of Sriracha. No oil is necessary. Leave the lid off and stir everything together. The mushrooms will release their juices and the sauce with start to thicken after a few minutes. We love this served over rice (fried rice in this pic) and with kimchee.


Honey Sriracha Beef Lettuce Wraps have to be the easiest lettuce wraps you can make and are amazingly flavorful. To make these simply brown one pound of organic, grass fed ground beef with about a half cup of minced onions. Stir in the same heaping tablespoon of honey and heaping teaspoon of Sriracha and sauté until the sauce is thickened.


I topped lettuce leaves with julienned red peppers and spiralized cucumber and added the beef and cilantro. Chris loved these even though our lettuce didn't "wrap" this time. 

Relax in the kitchen and be creative - it makes eating healthy much more fun.

Happily shared on Gluten Free Wednesdays!


Wednesday, June 13, 2012

Suzie's Pasta with Mint


The photo above was taken in my in-laws' kitchen many years ago and it's an old favorite. I loved that kitchen so much. It was a huge farmhouse kitchen with large wooden beams, a big window looking out to her rose bushes and room for everyone around their very long table.  My mother in law, Suzie, is a wonderful cook. With six children she certainly had plenty of opportunity to master many a recipe. Chris, as is very apparent, loved being home in their kitchen and being spoiled by his mom's French cooking.

The pasta recipe I want to share is one Suzie taught me to make about twenty years ago when she was visiting us in California. It is probably one of the most simple dishes she makes and when she first proposed making it I have to admit I wasn't really sure about it. Mint - in pasta? But one bite won me over.  This dish uses plenty of fresh mint, olive oil and fresh Asagio Parmesan. You can use any type of gluten free pasta you like but I find the corn pasta from Trader Joe's to be one of the best gluten free pastas around.

Last week Chris was working from home and amazingly it was just the two of us home for lunch. The mint in the garden had called out to me and I decided to make Suzie's pasta.


This has to be the fastest pasta you can make. While the pasta is cooking grate some cheese and slice up a handful of fresh mint. Perfect for a fast lunch with a mixed green salad or a Meatless Monday dinner. (Which I've been negligent in posting lately).

We sat out in the garden with our lunch and enjoyed watching the birds at the feeder, the bees buzzing the flowers and each other's company - something we don't have the opportunity to do very often. It was a short lunch but such a nice one.


Suzie's Pasta with Mint

This one is so easy you don't need a real recipe.

In a large pot of boiling water cook one package of gluten free pasta according to directions.

While the pasta is cooking, grate some Asagio Parmesan.  I grated about a cup, maybe a bit more, but the amount is up to you.

Take some fresh mint leaves, wash them and stack them.  Slice them thinly. Use as much as you like. Chris likes about twice as much as the photo shows.

Drain the pasta, drizzle with a little olive oil, add the cheese and mint and toss.  Grind some fresh black pepper on top if you like.

Enjoy it with someone you love!


Thursday, May 17, 2012

Marc's Graduation & Poha with Coconut & Cashews from Michael Natkin


It's been a busy few weeks and I've missed blogging but Marc just graduated from college last weekend and we were fortunate enough to celebrate with family and friends.

How I love these two!


Gorgeous photo of my gorgeous parents with Marc taken by Gabby.

Wonderful family friends even came from California to celebrate making the weekend even more special.


Words cannot express how proud I am of Marc and the wonderful young man he has become. His future is in God's hands and I can't wait to see it unfold. It was a crazy busy, deeply emotional and ultimately blessed time.

We had a great time at his party.  My friend Ruth helped me with set up.  Gabby not only made a trio of dips and her amazing beachy fruit salad but she also took gorgeous photos that we will treasure. Marie and her mom made shrimp skewers, watermelon skewers and the hit of the party - gluten free lemon bars garnished with strawberry slices.  They've shared the recipe and I'll be sure to pass it along soon.
She loves him as much as I do!
Oh my gosh!

I haven't had much time for catching up here or anywhere else for that matter. There are several posts that need to be done - one on Martin's Curry Rice's South Indian Sunday Brunch (which is amazing), one on our weekend in New York and a scrumptious gluten free bakery we enjoyed while we were there and some new recipes I've played with, too.

If you've stuck with me this far you deserve a great recipe!  Here's a new favorite recipe from an old favorite site I love. The website is called Herbivoracious.com and it is such a wonderful place to visit and just wander through. Michael Natkin presents vegetarian recipes from around the world with gorgeous photographs and the unique combinations he comes up with make simple foods really shine.  While not a gluten free site, many recipes are either already gluten free or easily adaptable. His Enfrijolada recipe is a family favorite and once you've made it the first time you'll find you can adapt it a million different ways for quick weekday meals.


This Poha with Coconut & Cashew is a recipe I intended to make a month ago or more. I've always got a bag of raw cashews in the freezer in case I need a quick fix of Sri Lankan Cashew Curry and I'd just gotten a nice big pail of shredded coconut from Tropical Traditions. All I needed was the Poha (flattened rice from the Indian market) so I ran out to get it that afternoon. Then something came up and I didn't make it that night or for the next couple of weeks. I finally got to make it right before all the graduation craziness began.  Although there are a few ingredients to gather everything comes together very quickly if you have everything ready and measured before you start. Our meal was a simple one of Sri Lankan Lentils, Basmati Rice and quick frozen organic veggies.  It was flavorful, satisfying and absolutely delicious.


I think you'll enjoy this as much as we did - let me know if you try it!

Monday, April 23, 2012

GF White Chicken Chili with Green Salsa


Although warm spring weather came early this year yesterday and today were really cold and drizzy days. I wasn't sure what to make for tonight's dinner but wanted something warm and satisfying. In looking through the pantry this morning the first thing I noticed was a bag of white beans near a large jar of green salsa. There were chicken thighs and cilantro in the fridge and although I'd never made a white chili - one without tomatoes - it sounded quick to make and perfect for a cold day.

It was quick and easy to make and there was enough for a crowd. I was happy that it ended up being a big hit. I took the photos a couple of hours before we actually ate so I wouldn't lose the light but we actually topped our chili with big spoonfuls of chopped cilantro and had a fresh green salad with it.  Simple and colorful and really satisfying. One of the best parts of this meal was the wonderful aroma that filled the kitchen all afternoon.

Chicken Chili with Green Salsa
Six to Eight Generous Servings

1 lb. White Beans (Great Northern) dry, sorted and rinsed
2 quarts Organic Gluten Free Chicken Stock (homemade would be even better)
1 Cayenne Chili - dry (optional)
1 24 ounce jar Natural Gluten Free Green Salsa
3 cups of water (or more if you want a thinner chili)
1 lb chicken thighs, boneless and skinless
salt & pepper to taste
1 bunch Cilantro, washed and chopped

In a large stock pan or Dutch oven place sorted and rinsed beans and cover with the two quarts of chicken stock.  If using a whole dried Cayenne chili, place in pan now.  Bring almost to a boil and reduce heat to low.  Simmer until beans are soft - mine were very fast today - maybe three hours.

Once beans are nearly cooked heat a saute pan to cook the chicken.  Saute both sides until cooked through (I didn't use any oil to saute) and once cooked (15 minutes for me) chop into 1/2" pieces.

Add the salsa, water and chicken to the beans and stir gently but well.  Add salt and pepper to taste and let simmer.  It was delicious at that point but even better three hours later when we finally ate.

Add chopped cilantro to taste and stir it in. My bowl was bright green because I'm crazy for cilantro. The guys' bowls varied in color considerably but we were all happy.

Enjoy!


Wednesday, March 21, 2012

Spicy Chipotle Burrito Bowls


I was just planning tomorrow night's dinner when I realized I've been sitting on these pictures for a while. Thursdays are busy here and everyone generally gets home late and we like to pile in the living room and watch sitcoms together. This meal has become sort of a Thursday night tradition for us. A build your own burrito bowl meal is easy and fun. They're a snap to prep in advance and everyone can customize their own meal.  Of course we got this idea from Chipotle which is one of our favorite places to eat. Their food is high quality and delicious and their staff is incredibly careful with gluten free orders. But we can't eat there every night. =D

A typical spread looks like this:


I prepare all the toppings and keep them in the fridge until serving.  This time there was just shredded cheese, guacamole, salsa, radishes, cilantro and hot sauce. Sometimes we'll grill something to add to the mix - it's really flexible.  The beans can be canned or home cooked and black or pinto - up to you.

The only two real recipes for this meal are simple.  Let's start with the rice. One cup of dry rice will expand to approximately three cups of cooked rice.  Double or triple as necessary and keep warm until serving.

Cilantro Lime Rice:

1 cup Basmati Rice cooked according to directions on package.

When cooked, fluff with fork and add:

1 Tablespoon Olive Oil
1/4 Cup Lime Juice
1 Cup Chopped Cilantro (or more, to taste)
Salt to taste

The veggies take only minutes to prepare if you have everything sliced and ready to saute. I usually start cooking them once everyone is actually home because they are so quick.


Chipotle Spiced Veggie Saute

1 Tablespoon Olive Oil
10 ounces Baby Bella Mushrooms, pre-sliced
2 medium squash, yellow or zucchini, cut into matchstick sized pieces
2 large Bell Peppers, cut in slices
1 large Onion, cut in slices
2 cloves Garlic minced
1/2 teaspoon Chipotle Powder (optional but tasty)
Salt and Pepper to taste

Heat pan to medium and add everything but salt and pepper at once.  Saute until everything is just cooked through but not too soft and season to taste.

Call everyone in the kitchen and let them serve themselves.

Enjoy!


Friday, December 23, 2011

Quick & Easy Tamales with Chilies and Cheese


One of my very favorite Christmas traditions is making tamales with my friend and neighbor Gabby. We get to catch up while we roll tamales and eat way too much. Tamale day gets better every year as we get our routine down and we always think our tamales turn out better than the year before. Today we made a traditional beef filled tamale and this version; which is the perfect tamales for both beginners and vegetarians. 

This simple version takes just minutes to mix up and since you skip the filling step they roll up quickly. Last year we filled our masa with the chilies and cheese but found the cheese melted right out of some of the tamales.  Nothing is sadder than an empty tamale.  By shredding the cheese and mixing the corn and chilies into the masa the flavor and texture is much more consistent.

Tamales are not hard at all; you just need a few supplies and go step by step through the recipe. 

First, you’ll need a couple of packages of corn husks or hojas to wrap your tamales.  They are crucial to give tamales an authentic flavor and texture.  I find them in many grocery stores and our local Hispanic market.  Two packages should be more than enough.  Soak them a few hours or overnight in a bowl or pan of warm water to soften. 


There are several different masa varieties available.  This time we used instant masa.  It cooks in far less time than non-instant varieties and makes for an earlier lunchtime. This is important to us. =D


You’ll also need a steamer.  The tamales need to steam over simmering water.  The steamer basket needs to sit an inch or two above the water.  You’ll need to make sure there is plenty of water in the pan so that it doesn't boil dry.

While we waited for the last of the tamales to finish we worked together to make a hat for Gabby's sweet little girl. Oh, she looked so adorable trying it on. 

We listened to our sons playing video games together and it cracked us up listening to little Ev keeping up with Marc and Joe.  They went out to play Frisbee in the unseasonably warm sunshine and we, of course, followed them out and watched them while we sat on the porch. The best part - whenever a car drove by they had to get out of the street and wait.  What did they do while they waited?  They danced.  All three of them danced!

Mike brought Olive over after nap time and we walked the dogs and laughed as Ev sang an alien Christmas song over and over and over. It was a perfect day. 

I think tamale day has to come more than once  a year.

Tamales with Chilies and Cheese

Set a large pot of water on the stove to boil.

In a heavy duty mixer place:

8 ounces Pepper Jack Cheese, Shredded.
4 cups Masa
1 quart Vegetarian (gf) Broth – room temperature
2 t. Baking Powder
1 ½ t. Cumin Powder
1/8 t. Garlic Powder

Mix at low speed until well incorporated.  Add:

1 ½ cups Corn, canned, fresh or frozen
1 7 ounce can Diced Green Chilies

Mix again.  You may need to hold your hands on the sides of the mixing bowl to keep the mixture in the bowl; I did.   Stop mixer when all ingredients are evenly distributed.

Now you are ready for your corn husks.  Take about ¼ cup of the masa mixture and put it right smack dab in the middle of the corn husk just as Gabby is doing, right. Fold over the left side and then fold the right side over. Tuck the bottom under and stack in the steamer basket.  Keep filling, folding and filling the steamer basket until it is full but not tightly packed.  You want the steam to be able to circulate.


Once the steamer is full; set it in the pot and cover.  With my pots I have to use heavy duty aluminum foil to cover the steamer basket as tightly as possible.

Steam about one hour or until steamed through – to test take one of the tamales out of the steamer and open.  If it still sticks to the corn husk and is gummy and soft you’ll need to give it a few minutes more.

Today we had them with salsa and guacamole and some hot sauce.

Thank you, Gabby for taking such great photos.  You can certainly tell which are yours and which are mine. =D

Enjoy!

Monday, October 10, 2011

Mediterranean Flat Bread Pizza


I love Mediterranean and Greek style pizzas and recently realized that I'd never made a gluten free version.  The pizza crust I usually use seemed a little heavy and thick for the lighter Mediterranean flavors so I decided to use my hummus pita recipe instead. I thought about making them per the recipe for a softer, thick crust but Chris really loves a thin, crispy crust so that was my goal.

Making a crispy flatbread is easy. Just spread the crust out very, very thin and bake them until almost crispy before topping makes for a perfect crunchy crust. The hummus in the crust adds a great base layer of flavor.  You can decide how large you want to make your pizzas.  The first time I made them I made 18 small crusts to have as a side/bread.  You can make them ahead and just top and heat when you're ready to serve.  Today I made two very large pizzas with the same recipe.   


Bake them on parchment lined baking sheets in a 450 degree oven.  The smaller size baked for about ten minutes before topping and the larger took a good twenty minutes.   Top and bake until toppings are heated through and the cheese starts to brown.

The small pizzas were topped with the ingredients listed below but be creative and add the things you love:

1 can Artichoke Hearts, quartered
1 large Roasted Red Bell Pepper, chopped
1 medium Green Pepper, sliced
½ red onion, thinly sliced
10 Kalmata Olives, quartered
8 ounces crumbled Feta Cheese
4 ounces shredded Mozzarella Cheese
Olive Oil, drizzled over to taste
Fresh or dried Oregano to taste
Salt & Pepper to taste

The large pizzas were topped a variation of the above recipe but without the artichoke hearts and green bell pepper.


The tomato pizza had thinly sliced tomatoes on top of the cheese mixture – but you knew that.


I covered the crust of the other pizza with handfuls of baby kale leaves before spreading the cheese mixture over the top.  Even Marc, who hates kale, loved it.


Enjoy!

Monday, September 12, 2011

Meatless Monday & Mexican Pizza


One of our favorite grocery stores recently started carrying a gluten free Mexican pizza.  It sounded great to us but found that while some of them were great, others were not so good. They were too spicy for one of us and not flavorful enough for others. We really liked the concept, though, so I wanted to figure out an easy version to be able to make on busy school days.  I have tinkered with a couple of crust versions and this is our favorite.  It holds up to the toppings, is a little crunchy and has a nice corn taste.  We liked it rather thick (as you can see in the picture below) but you can always pat it thinner.

The toppings can be anything you like.  We have done pureed pinto and black beans, grated Colby jack cheese, guacamole, salsa, chopped onion, chopped cilantro, sliced fresh from the garden Jalapeños and hot sauce.  You can be creative and add anything you like.

If you’re starting out on the Feingold program you can make this stage one easily.  Just keep the salsas and peppers off and you will still have a lot of flavor.

Mexican Pizza
Have 2 baking sheets covered with parchment or pizza stones ready
Oven to 425 degrees - makes six individual pizzas.

For the crust:
1 package Bob’s Red Mill Gluten Free Corn Bread Mix
1 Cup Water
2 Eggs
½ teaspoon Cumin
Dash Garlic Powder

Mix everything together for a stiff dough.  Divide into six balls.  Pat each ball into a circle with damp fingers on your parchment lined baking sheet.  Mine were about six inches across. Three crusts fit well on each sheet.

Bake at 425 for 20 minutes.

For the black bean “sauce” just puree one can of beans with a bit of the liquid in the can - add a bit more if the beans are too thick. You want it to be the consistency of pizza sauce. That will be plenty for six pizzas.

Sprinkle your pizzas with your favorite toppings and put back in the oven briefly – five to ten minutes for us. 

Garnish with salsa and guacamole and enjoy!

Sunday, August 7, 2011

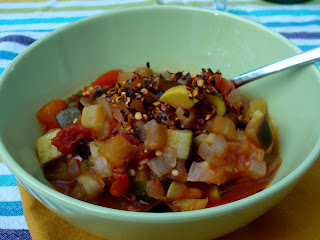
Meatless Monday – Ratatouille with Fried Crushed Peppers


Late summer is the best time of year to make a pot of ratatouille and everything you need is fresh at your farmer’s market now.  Like all my favorite recipes this is very flexible.  More zucchini and less yellow squash, not a problem.  Less eggplant and more bell peppers would work just fine, too.

It’s quick to put together and is one of those wonderful dishes that tastes even better the next day.  A bowl of ratatouille is great on its own and we love it over rice, too.  We often sprinkle parmesan cheese over the top but this time we tried something new.

Friday evening we had curry at Martin’s and we asked him about the crushed red peppers he keeps on the counter.  We love the smoky heat they give our meals. I asked him what made them different than the usual crushed red peppers you sprinkle on pizza.  When he told me he fried them I knew I had to try that for myself. While making the ratatouille I decided to go ahead and try frying a cup of peppers never planning to use them on our meal. But they smelled so amazing together that we had to give it a try. Oh my goodness it was such a great combination!

Ratatouille:

Chop into half inch dice:

1 medium Eggplant
2 medium zucchini
2 medium yellow squash

Place into a bowl or salad spinner and salt generously.  The vegetables will “sweat” any bitter liquid out while sitting.

Meanwhile, mince and sauté in a large pot or dutch oven:

1 tablespoon olive oil
1 large yellow onion
1 large red bell pepper
4 cloves of garlic

Rinse the eggplant, zucchini and squash in cold running water and drain.  Add to the pot and combine.

Add:

1 large can of tomatoes, diced (mine was 28 ounces)

Simmer 30 – 60 minutes, stirring occasionally, until vegetables are tender and flavors have combined.

Fried Crushed Peppers:

1 cup crushed red peppers
1 tablespoon oil of your choice

In small pan sauté peppers slowly until they just start to change colors.  Watch carefully so they don’t burn and take off heat as soon as they start to brown.  They will continue to brown a bit as they cool in the pan so give it a stir occasionally as they cool.  Store in a glass jar and sprinkle on ratatouille to taste.  


Enjoy!

Sunday, July 31, 2011

Meatless Monday - Indian Style Veggie Burgers with Cilantro Chutney


A couple of nights ago we had veggie burgers for dinner with a new twist.  I wanted to play off the spice blend of this recipe. Indian cilantro/coconut chutney is such a fresh and spicy way to top them off and give them more of an Indian flavor.  A cooling raita-style sauce would temper that heat.

I’ve had this particular Raw Cilantro Lime Chutney bookmarked just waiting for the right meal to try it with. I used a small cayenne pepper from the garden instead of the large jalapeño called for in the recipe. It seems I can never follow any recipe (even my own) to the letter but I came very close time – halving it and skipping the zest because I had bottled organic lime juice on hand.  It really was great and just the right amount for our meal.  

One grated cucumber in one cup of plain yogurt made for a simple raita-style sauce that we used along with the chutney.

The buns were made from Pamela’s Gluten Free Bread Mix and I made them very large and flat so they would be almost like a pita. I’ve got to say, though, these veggie burgers are great without a bun.  Just pile on the toppings and enjoy.

The kale in our garden is growing by leaps and bounds even in this oppressive heat wave so kale chips rounded out the menu tonight.  I think this simple but great recipe has been done on just about every blog lately but here’s a good one and one with a nice name. =D  Salt was my only seasoning this batch. 

Indian Style Veggie Burgers
Makes 10 – 12 depending on size.
Bake at 425.

1 cup red lentils, washed and drained
½ teaspoon garlic powder
1 teaspoon ginger powder
1 teaspoon turmeric
Dash cayenne powder – or more to taste

In a medium pot cover lentils with 2 1/2 cups of water, add spices and bring to a boil.  Cover and simmer until cooked – about 25 minutes.  Make sure the pot just simmers and doesn't boil over – turmeric is a bear to scrub off white cook tops. =D   

Add ½ cup coconut, finely grated and let cool until a few minutes.

Meanwhile, in a large bowl add:

3 cups cooked, cool basmati rice
1 small onion, finely chopped
1 medium carrot, finely grated

Add lentil/coconut mixture and season with salt and pepper to taste.

On parchment lined baking sheets shape 10 – 12 veggie burgers.  Bake for about 15 - 20 minutes until lightly browned, remove from oven and carefully flip over.  Bake another 15 - 20 minutes.  They will crumble easily if not picked up with a spatula.

These veggie burgers were the biggest hit with my family and I’m sure I’ll be making again.  One funny thing at dinner, our dog Elle, who does not beg at the table, came up to me and kept staring at me with her big brown eyes.  She wanted the kale chips.  She went absolutely nuts when I dropped one her way.  Who would have guessed?

You've still got time to enter the contest.